Crafty Moose gone wild!

Welcome to the Ticklish Moose blog!

Be sure to visit my webstore for some great freebies, as well as Ticklish Moose merchandise:


http://www.ticklishmoose.com/

Creative License

Creative Commons License
All Shown On This Blog by Ticklish Moose is licensed under a Creative Commons Attribution-NonCommercial-ShareAlike 3.0 Unported License.
Permissions beyond the scope of this license may be available at http://www.ticklishmoose.com.

Search This Blog

Thursday, December 1, 2011

Trash to Treasure!


Trash to Treasure!, originally uploaded by ticklish_moose.
Seems I can't get enough of upcycling chairs!

Like a lot of things over 50 yrs old, this pair of Danish Modern chairs had some creaky joints and were a little rough on the surface. We gave them a complete overhaul (original finish was not salvageable) and instead of being headed for the landfill, they are now headed for my space @ The Antique Gallery of Lewisville!

Thursday, November 17, 2011

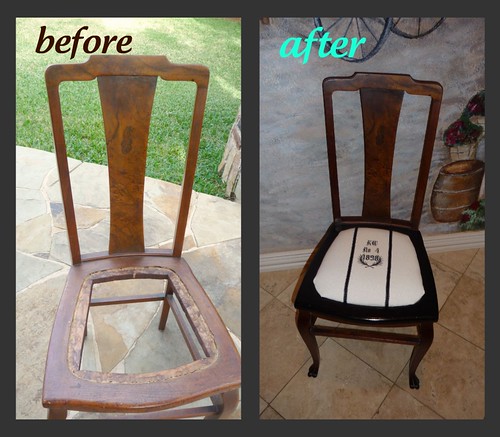
walnut chair refurbish


walnut chair refurbish, originally uploaded by ticklish_moose.
picked up this well worn walnut burl chair for $10 at a garage sale. The seat was covered in some darn ugly green fabric, which I removed and recovered with my own embellished design. I painted the seat frame black and just refreshed the rest of the chair with some Old English.

I think it turned out great!

Tuesday, November 8, 2011

Grammatically Different Plates- Fresh Ideas Tutorial

Imagination is everything. It is the preview of life's coming attractions.
Albert Einstein

'Live-Laugh-Love'
'I Hope You Dance'
'Believe'
OMG! I am LOL because it has all just gotten so ridiculous, IMHO....

Is that what life has become- someone else's catch phrase?  Does it really reflect your thoughts and wishes for the day?  I am thinking "we can do better than this".  


By now you know I love quotes and Bible verses.  I find great inspiration and comfort in many of them.  I think words hold great meaning.  You probably know someone that has a favorite verse as well.  So wouldn't it be great to give someone (or yourself!) the gift of a word phrase that actually has some deeper meaning?  I'm going to show you how with just an inkjet printer and a few inexpensive supplies.

For this project you will need:
  • A few ceramic plates (or tiles)
I pick them up all over.  You may have a few lying around, but each of these were purchased for anywhere from .49-$2.00 ea.
  • Denatured Alcohol* (find it @ the hardware store)

*flammable- please use in well ventilated area away from flame
  
(click on above link to see where to buy)

 Lazertran has a TON of applications, but for this project we are applying it to a ceramic surface.  I used black type, but you can print colored images if you choose. Don't worry- We'll have more fun with it another day.

  •  Spray Polyurethane* (gloss or satin/matte)
* note: MUST be a urethane- acrylics will not dissolve film! 


  • a few cotton balls
  • a pan of water about 1" deep large enough to hold transfer
  • inkjet printer
There are basic instructions that come with the Lazertran, but believe me- it is nothing compared to the voice of experience here.  A few things to consider:

Choose a plate with a specific rim/edge detail to ease the transition from the Lazertran to the edge.  You can see a faint line of the transfer on some types of plates more than others, especially with a curved inner edge.

 Try to make your image a large enough size to come close to the transition line.  It just looks neater.

I thought the gloss urethane gave a better result on my ceramic plates, but consider the original sheen of your item to give it a authentic look.

If you need to sand out any imperfections in your urethane finish- be sure it is fully cured and use a scotchbrite style sanding pad (fine grit) and lightly sand the surface without putting any real pressure on the pad.  Then apply a light final coat. You may also need a sharp pin/needle to prick air bubbles in the transfer.  

Measure your plate ahead of time to determine the size of your phrase.  I like to use Publisher because it has a handy ruler on the side of the page, but use whichever program you are familiar with.  You do not need to "mirror" or flip your image!  Also, I do at least one 'test' sheet on regular paper to be sure I have things the correct size before I print on the Lazertran sheet.  I would much rather waste a cheap piece of copy paper getting things right.

When you have things the way you want it- print on the white side of the Lazertran.  I'm cheap, so I try to get 2 or more projects per sheet.  Allow it to fully dry- 30 mins or so.  If you are impatient you can try a heat gun, but no promises- OK?


I like to find a circle 'template' to use to get the size/centering correct.  You may have a circle cutter.  I do.....somewhere!  If your plate is square, measure twice, cut once ;-)


Use a pencil to mark your cutting line- then cut just inside the line.


Gather your materials on a covered surface


It's good to check the back of the plate so if there is a logo you get it orientated correctly with what will be your finished product.


Sunday, October 30, 2011

Custom Stamps- The Way To Go!

Just a quick post to give you a heads up on a favorite product I have recently purchased- They are custom Trodat rubber stamps from Stampxpress.com!  I use them on all of my merchandise hang tags for the products in my booth, as well as return address info on packages and letters I send out.

With this being Breast Cancer Awareness month an easy way to help the cause would be to order your custom self inking Trodat stamp with the Breast Cancer Awareness ribbon so the profits go to help cure this horrible disease.

It seems that every woman knows at least one other woman affected by breast cancer.  I hope that none of you has personally suffered this kind of loss, but I have lost 3 people in my family to cancer and it is so hard.

With Christmas right around the corner, many of us will be sending out cards, and it makes it so much easier to be able to stamp the signatures or return address- and you can truly get so many designs now, why not?   Trodat stamps are made in the USA, and I am such a big supporter of all American made products and companies.  I think it is hard to complain about the state of the economy if you are not doing all you can to support small businesses right here. 

Thanks for taking time to make a difference today!  I always appreciate all that you all do!!

Sunday, October 23, 2011

Bad Blogger is Back With a New 'Old' Lamp Project!

What can I say?  It's been a busy past few months!!  My son returned to High School and so we had to get back into the 'school routine', my Rheumatologist had me try a new medication which did not agree with me at all.  As a matter of fact, lets just say short of my anaphylactic reaction to a few other medications I have had in the past, it ranked right up there on the 'bad experience' scale.

I also got a new great-niece!  After 40 hours of labor (yes- you read that right!)  beautiful (and not just because she is 'ours') baby Arwen was born!


Then I went on an 'antiquing' trip to MI, got some fabulous things, got sick from being stuck in that sardine can they call flying coach, and just barely had time to whip up a fall project!   I tend to decorate for fall, not Halloween.  I don't have any small children and the fall theme takes me through Thanksgiving.


Lately it seems, I have had a 'thing' for lamps.  I don't know why.  Possibly because they are plentiful and inexpensive.  One thing for sure- I will never pay full price for a lamp or shade again!

So here is my 'latest' new 'old' lamp project:


But- as usual- we gotta get there, right?  

I recently bought the barley-twist lamp in the photo at our neighborhood garage sale for $3.  I switched out the shade for a narrower one I had on hand from a different lamp I was not currently using so I could group the lamps together.  I think it makes for a kinda neat display  :)

The 'project' lamp is an old, sad 8" tall (minus the shade) glass lamp I got at the local thrift for $4.49.  You know the kind- popular in the 1980's.  Depending on your age, you may already have one around the house  ;-)
Be sure to look at the bottom to see that it is easily taken apart by undoing the wing-nut that holds the threaded rod that goes up the middle.  Just undo it, loosen the cord up through the lamp and you are ready for spray paint.


 I used black satin spray paint and put a little blue tape around the cord to keep the paint off.  Paint the base, and the brass-colored threaded rod that goes in the center.  Of course, you can use whatever color suits you and your project.  Clean the glass and get ready to fill it up!  You could use pine cones, acorns, candy corn.....I chose these cute mini pumpkins and threw in a few small pine cones from my stash.

All My Best

Telling People What I Think For 40+ Years!!

Blog Advertising - Advertise on blogs with SponsoredReviews.com