Crafty Moose gone wild!

Welcome to the Ticklish Moose blog!

Be sure to visit my webstore for some great freebies, as well as Ticklish Moose merchandise:


http://www.ticklishmoose.com/

Creative License

Creative Commons License
All Shown On This Blog by Ticklish Moose is licensed under a Creative Commons Attribution-NonCommercial-ShareAlike 3.0 Unported License.
Permissions beyond the scope of this license may be available at http://www.ticklishmoose.com.

Search This Blog

Sunday, December 5, 2010

More *almost* Free Gifts

I like to think that God has a sense of humor.  

Case in point- I have often been referred to as 'The Queen'......don't ask me why  ;-)   Seriously- even as a little girl my parents said I must think I was the Queen.  Hmmmm.  So, it would only be *fitting* that I should get a crown for Christmas, right??  Unfortunately, the crown I am getting is NOT the kind to put on my head!!  That's the irony at play here.....last night I cracked a porcelain crown on a molar.  Yippee  :/

So guess what.  More people on my gift list will be getting something handmade this year.  Not necessarily a bad thing. 

I visited a few craft shows in the last few weeks, and there are lots of ways to spend your hard earned money to buy 'personalized' gifts for the folks you love.  I have admired the collage name prints that have the lettering made from architectural pics that resemble or are letters.  Given my architectural background, that is a given, right??  


You can imagine my excitement when I found a Flickr group with these images to share FOR FREE!!  Ahhh, sometimes the stars align.  The name collage prints I saw for sale (unframed) at the craft shows were running just about $10 per letter, and that was in black and white.  I'm sure with the cost of colored ink, they figured why bother increasing their costs, right? 


Certainly, if you want, you can make these personalized word/name prints in black and white.  I like to add color through artwork, so I chose to print my collage on my color laser printer.  Just to save you some time, effort and ink, I will tell ya I tried this with canvas paper and got a pretty mottled result.  I got a vivid print with white cardstock, lightly textured.

Here is my collage print:


Here is my finished project:


The editing and collage program I use is Picnik The basics are free, but the collage part I used is in the premium features which are under $30/yr.  You may already have an editing program you love.....I was just putting that out there for anyone that doesn't already have one.  


Leo Reynolds  is kind enough to share his fabulous collection of architectural photos with everyone FOR FREE (you can tell I love FREE, right??) as long as you follow his copyright rules, which means no resale, but give as many of these awesome gifts as you choose!  


 Just a footnote:
I had my mat custom cut @ my local hobby store for a cost of $5.  The frame was one of many I have purchased over the course of the year at garage sales, etc.  You may have one laying around that could just use a fresh coat of paint.  But, still this project was far below the $150+ it would have cost to have the people at the craft show do it- and the most time consuming part was looking through all of Leo's great photos and selecting my favorites.
A BIG *thanks* to Leo for all of the fantastic Flickr images!

Thursday, December 2, 2010

Still Time For a Homemade Gift.....

The weather outside is delightful these days.  But, being December it is not destined to last.  We have had a very mild and dry fall.  Most of our trees still have not turned colors.  It seems strange to have green leaves on many trees, and Christmas decorations everywhere.  I grew up in Michigan in the crook of the thumb and when I lived up there the first 20 years of my life winter meant SNOW!  Lots and lots and lots of snow.  Truck it down by the Tittabawassee and maybe by June it would be all gone. 

The extraordinary diversity of Texas includes 10 climatic regions, 14 soil regions, and 11 distinct ecological regions.  Here in North Central Texas we have 4 distinct seasons.  That means lots of clothes for everything from zero to 110 degrees!!  We are blessed with a long *flip flop* season, but we definitely also use warm coats, hats, gloves and boots.  Which brings me to this weeks tutorial.  It is a fast, fun upcycle which has a million possibilities for customization and personalization, and it is totally wearable, too!

Isn't this the cutest headband ever?? 
(Not so sure I'm giving this one away)


Here is my finished project:
Once you see how simple these are to make, and basically free, you will never spend $$ to buy one again!  I am totally working on the matching scarf!

Okay- this looks like a lot of steps, but hang in there.....once you get the pattern made it goes really fast.  
Gather some supplies:
I used an old pair of grey sweatpants that no longer fit anyone, and a scrap of red polar fleece left over from another project.  I am also considering using the wording area from a sweatshirt that no longer fits, and a felted sweater.  I hope to have some of those made to show you before Christmas, but no promises.  If you make one, I would love for you to email me the pics, so I can add it to the blog for others to see  :D
You will need basic sewing skills, basic sewing supplies, some paper to make the pattern (I used legal sized printer paper), and freezer paper for the stencil.    
I started by freehand sketching a basic headband shape on a piece of legal paper:
To make it come out even, fold in 1/2 width-wise, then fold in 1/2 length-wise, and refine the shape when you cut it out.  Use your sketch lines as a guide:
Here is the first part of the pattern cut out:
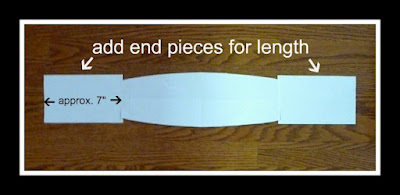
Add some ends to make it long enough:
Trim it to smooth out the shape:
Now you have your pattern!  Cut one of your top fabric (mine is the grey sweats) and one of the lining (mine is red fleece).  Be sure you cut your length with the stretch of the fabric!  I cut out a test pattern from some scraps of plaid fleece just to be sure I liked the size of the band on my head.  I have a pretty *average* sized head, so my pattern size should work for *most* everyone.  If you are the *Big Head* person in your family, (you know who you are) you may want a slightly wider band.  
 Here is the part that took me forever the most time.....picking the graphic!  Lucky you- you can copy my design if you want!
You are welcome to download a copy here:
When I printed it, I used the 'landscape' paper setting, letter size paper, and I 'justified' or stretched it to the length of the paper.
I traced the design loosely onto my freezer paper.  If you want, you can print on the freezer paper.  I wanted to be able to trace it more than once.
 Carefully cut out your design, and iron it onto your fabric, using the 'wool' setting on the iron:
I used VersaCraft ink for fabric in black.  I blotted it on, using my fingers under the fabric to get the edges of the design darker.  You could also use paint for fabric, or add a textile medium to acrylic paints.  Just be sure to heat set after it has dried.  

And We Have A Winner!!

Let's face it.....we are ALL winners, right??  But only one *special follower* can be the recipient of the $35 Gift Certificate from my good friend Sean @ CSN Stores!  I want to use a little space here to thank Sean for his support, and for helping to make someone's holiday just a little easier with his generosity.  :D

Drum roll, please........


Mixin' it up.......


Sorry for the blurry pic, but it's not easy to look away and take the pic at the same time!!!
And the winner is.........


The Winner is Princess of Everything!!!


I will be sending you an email to give you the coupon code for your gift!
Thanks to everyone that took time out from their busy holiday schedule to read my blog, leave a comment, and lift up my day.  I cherish each and every one of you, and want you to know that it enriches my life to hear from you!
Okay.....got a tutorial I am finishing up, and these holiday decorations are not getting themselves out of the boxes, so I will be back a little later!  :)


Monday, November 22, 2010

Oprah's Favorite Things?? The Real Reasons For Giving Thanks, And A Giveaway!

Oprah-shmoprah.  I'm sorry, but most of the *favorite things* are great if you are in the audience, and you're getting them for free!!  But what about the rest of us poor schmucks??  

Our favorite things often lie in the simple things in our lives.  My list is pretty short and sweet.  And, after my *many* years on this planet, my list no longer centers around material goods.  I won't tell you that I don't enjoy driving my fancy car, because it is better to have reliable transportation than the kind we had many years ago.......I have not forgotten driving with jugs of water in the back seat to refill the radiator on the wrecked Chevette.  But I know my true happiness does not rely on those things. 


I watched Oprah's *Favorite Things* Show last week, like I do every year.  Mostly to see what made the list.   Then, I thought.....why not share MY list, and ask all of you to list one of your *favorite things*?  It can be anything that makes you happy.  

For example, I love getting things ready and packing my suitcase for my annual birthday trip to Michigan.  It's not just getting to leave town for a few days.....it really is about my roots, seeing my family, and sharing the dark humor we are known for with the people that get it.  I love driving past the farms, seeing the fall colors, and that feeling of being loved and grounded all at the same time.  

Just about a decade ago, I lost 4 family members in 5 years, 3 of them to cancer.  It was so hard, for so long, to see anything in that experience that was good at all.  The holidays were by far the most difficult time for a long, long time.  I could hardly bring myself up enough to even decorate.  There were so many years we were together for Thanksgiving or Christmas and we took for granted that it would just *be* that way.  Richard would drink too much, Mom would complain the turkey was dry, Karen would burn the rolls, I would force people to try a new, healthy alternative to the old holiday recipes.  Then when things changed, I realized how much I depended on them to be the same.  I was lost for a long, long time. 

Thursday, November 11, 2010

Gotta Have Bling Part 2- Chenille Letters

First let me say a big "Thanks!!" to all who emailed me for the first set of files.  I am happy to share my files, and would love to see what you make with them!

Second- let me just say a big "Boo-Yah!" and "Heck Yes!!" on the harvesting of the first vegetables from my garden!!!  Yes....it's true!  For a mere cost of $3500 and a timeframe of 7+ years, I grew and harvested 3 watermelons!  But, I don't want to toot my own horn here (right...?)


Okay...on to the tutorial and freebies!!  
Is this just the cutest High School sweatshirt ever??


 I branched out from the High School sweatshirts and did one just for the love of Texas:


And here is how to make some of your very own!

Like before, just shoot me an email and let me know what format you need the font files in, and I will send them to you FOR FREE!!


Note:  These are not true type fonts.  You will need to use your editing program to size them and arrange them.  These designs fit 4 x 4 or 5 x 7 hoops.  I am giving away these font files.  You may use them for your own personal use, sell items made from the files, give away the files with appropriate tag-back to Ticklish Moose, but may not reproduce and sell these font files.  Simple enough, right?  


If you do not have an embroidery machine, you can still make chenille letters by printing out fonts on freezer paper, pressing it to the fabric, and sewing a small zig-zag stitch following the outline of the fonts.  Use a stabilizer backing to give the letters some body.  Then follow the final steps to create the chenille. 


Start with any T-shirt, sweatshirt of hoodie, the fabric of choice, and I use flannel behind the fabric to make a *poofier* applique.  I have found that like the rag quilts, the flannel makes a really nice fringe-y edge.


Friday, October 29, 2010

It Don't Mean A Thing If It Ain't Got Some Bling!

I am still alive, faithful followers....but barely!  I feel like I just can't get caught up no matter how hard I try.  I wanted to put this out there: I have been having much more frequently what are commonly called 'ocular migraines'.  I was wondering if anyone else out there had any info they could share with me about this.  Of course, the first time it happened I was sure I was going blind from the Lyme.  It was super-scary, but I did a little research, and spoke to my Neurologist who said to just keep a log and if they become 'too frequent' to come in.  What is 'too frequent'??  Do any of you know anyone that has these and has determined some sort of 'trigger'??  I still have not put two and two together with these.


Okay, enough with that.  Let's get down to the good stuff!!  *Blingaholics* unite!  I have a fun project with freebies I am sharing today.   If you are interested in creating some shirts of your own, just leave a comment or send me an email, and I will email you the embroidery font files *free of charge*!
Be sure to let me know what format your machine uses!


My son goes to a new High School that opened last year with Freshman and Sophomore's only.  Awesome!  Beautiful campus, excellent staff, no Senior 'meanies' to detract from the excitement of Freshman year.  One HUGE problem though.....Ugly school sweatshirts and T-shirts!!  I have seen some from other schools in the area, and ours are definitely some of the ugliest! (sorry to whoever 'designed' them)  I thought there was certainly room for improvement- let's leave it there.  The beauty (??) of this project is that you can use the ideas to apply to any group.  These pics for instruction are actually from some sweatshirts I am doing for another school.


First the 'legal stuff':
These designs are my own, and are copyrighted.  You may use these ideas and files to create your projects and sell those projects.  You may not copy or download these files and use the files for resale.  I am giving this away to you, please do the same, but give credit or a linkback to Ticklish Moose and this blog. :)


A few notes about this project:
It is designed for use with machine embroidery, but you could also make templates with a graphics program and sew around the letters with a regular sewing machine, or even by hand!  The project I am posting today is 'reverse applique'.  I will also post a different project next week with the sweatshirts I have been doing with 'regular applique'.  You can use either one of the files I will send you to do the reverse or regular applique.

I buy Guildan sweatshirts from Jiffy Shirts 

I use between 40 and 60 5mm Hotfix crystals per sweatshirt.
April at A Crafty Family  is my source for the crystals, and her level of customer service is second to none!

The first thing I want to discuss if fabric choice.  From experience I have found that definite geometric prints do not work well for either of the applique applications.  Random patterns, solids, batiks or blending fabrics are going to be your best bet.  Use a good quality quilting cotton type of fabric, or even t-shirt knits.  Pre-wash and dry both the sweatshirt and the fabric so you don't get any 'wonky' shrinkage after you are finished.

Second- use a good quality, medium weight, cut away stabilizer.  Use a needle made for stretch/knit fabrics!  I use a 90/14 ball point.  If you use a sharp you will just punch/tear holes in the knit.  

Friday, October 15, 2010

And....The WINNER is......

First of all, let me apologize for being gone from the blog for sooo long!  I thought about all of my followers every day, wondering the outcome of the Great Giveaway.  We have had a family medical emergency, and I just have truly not been able to catch my breath.  I'm not sure why these things always seem to time out this way.  Just Murphy's Law at work.  Ahhh Murphy....not sure who you were, but you were wise.


So- Let's get down to it!!!  :)


As promised, I wrote down all the names of everyone that was kind enough to leave a comment on the blog.  


Folded them and put them in the basket:

Mixed them all up really, really well:


I will contact you and let you know how to get the gift certificate, and my thanks to everyone for staying with me through all of this turbulence.


I certainly hope to get back to crafting and sewing just ASAP!  I am definitely in need of a creative outlet!!  

Thursday, September 30, 2010

ONLY HOURS LEFT!!

But there is still time to get (another) entry into the Great Giveaway!!
Just comment on any post from August or September, be a follower--And you're IN! Simple huh??  But let's face it....I am not about complicated.

Thought you would like a peek at a new project I am working on:
These chairs are Alabama Channin, but I recently purchased a few sad rejects from the local thrift that are very similar in overall design to these, and of course, the seats were shot (perfect!)......but they were sturdy overall.  I am going to try my hand at refinishing them, and adding webbing and thrifted men's ties to get a similar look as these. 

I totally refurbished the Baker's Rack I bought for the retail space.  It was not in bad shape at all, but by using spray paint for plastic I transformed the top from the fake vinyl butcher block to a more upscale black/white combo for the rack, and I think it certainly reflects my aesthetic much better.

So, as you can see I have been short on the bloggin' but not for lack of enthusiasm.  I have just been working hard behind the scenes :)  

Alrighty....I'll get this up so you have a chance for another entry!  Good luck to all of you!!!

Monday, September 20, 2010

"Luxury must be comfortable, otherwise it is not luxury." -- Coco Chanel

I have to say- I totally agree with Coco on this.  What good are nice things if they are 'too nice' for the people around you?  I have always worked my designs with this in mind.  I wanted to honor Coco in a recent upcycle, and I thought I would share it with all of you.  


 I have a *thing* for boxes and containers of all kinds!  Some because they help hide my clutter, some hold treasures, others help keep me organized.  So, when I saw this outdated jewelry box, I knew I could give it a new life's purpose!


I was inspired by an image I found online called "Chanel Bicycle".
If you 'google' vintage bicycle images, there are quite a few choices.  Evidently there was a design craze early in the 20th Century for high end designers to do bikes.  There is an awesome Hermes' as well.  If you click on the Graphic's Fairy button on my side bar- Karen has lots and lots of great vintage images she shares as well. 


This upcycle was actually one of the easier ones I have done.  You may have a childhood jewelry box of your own that needs a new life- I found this one @ my local thrift shop.  The glass was easily removed from behind by loosening the screws and set plates.  I used the glass for my template for my new fabric insert.  I simply printed the image on my laser printer (you can also use inkjet) onto a product I like to use called  Lazertran .    Then I ironed it onto the burlap piece I had cut oversized, for the insert.  I adhered the burlap to a stiff piece of cardboard, and cut to fit.


Wednesday, September 8, 2010

Really Exciting News!

Sorry if it seems I have been MIA...I feel like a bad blogger!  But I have the most exciting news!  A new 'gallery' opened in town- right on Main Street.  I have been wanting to go in for a few weeks, and finally stopped and met with the owner, Joan.  She is a silversmith, and in her past life did community development in Kansas.  She prefers the shop not be called a 'gallery', because that gives it too snooty an aire, but for lack of a better word today that is what I am calling it.

 Here is a look at the cool place she has named 'Artizan's Alley'


Here is a peek at the inside:


 So....here is the really exciting news.....
This is my spot in the gallery!


Yes, this is my little piece of the world!  I am sooo excited!!
So, if I seem distracted.....now you know why.  :)

Of course, there is the big job of readying the space, and selecting which items to display.  I spent the better part of the weekend over Labor Day looking for and acquiring a white Baker's Rack to go with the white commercial grid wall panels I already own.  I missed out on one or two, but found the perfect Baker's Rack on craigslist for a mere pittance, and it is in 'like new' condition!  My sister is planning to share in the space with me, but also has not narrowed down which items to sell.  

Oh- there is also a cute little luncheon area in the shop with the best under $8 menu I have seen in a long time called 'Apron Stringz'.  Joan and her husband also used to do special event catering.  The menu is made up from fresh ingredients and ideas, so if you are ever in Old Town Keller, then be sure to stop in and have a bite to eat, as well.  


So, that is all my news for today!  I do have a couple of great tutorials I am working on, and hope to post one by the end of the week.  

We seem to have gotten past tropical storm Hermine for the time being, although it dumped about 6" of rain in my area.  My thoughts and prayers are with all of those that continue to be affected by the flooding. 

Tuesday, August 24, 2010

Finally-- The Great Giveaway!!

As usual, I don't seem to get things done as quickly as I promise would like to.  But, this giveaway is super, and sooo easy.....because let's face it, I just can't manage complicated!  

This time of year seems to bring with it not just holidays and decorating, but also lots of entertaining as well.  Here is the great part- if you would like a little help it is here for you!  There is a great site where you can upgrade your Dining Room with the help of our giveaway!  My friend Sean from Dining Rooms Direct has been nice enough to offer a $40 gift card to the winner of the giveaway!  Look at some of the cute things they offer:


You could get this runner for free!!
This retro table for next to nothin'


Or a cute Island:


Or adorable Baker's Rack:


Told you there was cute stuff!!  

Okay, so now that you are dreaming of what you can do before your overly-critical loving family arrives for Thanksgiving dinner, here are the terms of my Great Giveaway:

1. Be a Follower
2. Leave a comment on any post
from August 1, 2010 thru Sept. 30, 2010
I will put your name in a hat, and draw for the winner on October 1, 2010.
I will enter your name for each comment you leave.

That's it!


Good Luck!! 


Thursday, August 19, 2010

Eat Your Veggies!! A Recipe To Help


I love vegetables!  Not all, but most (sorry Brussels Sprouts).  Every year I start a vegetable garden~ I imagine myself with a bushel basket in my arms, overflowing with the fruits (& veggies) of my labor...sharing with my neighbors.... "why, YES! I did grow these myself.....no-no....I have plenty...please enjoy!"


In reality, this is what I get:


Yes, it's true.....I have yet to eat a single berry, bean or melon from my own garden!  Every year the same optimism~ every year I am dealt a crushing blow from Mother Nature.  I guess that is what comes from a Big City gal trying to be Fanny Farmer.  I am hoping that some of you out there can help me by telling me what it is I can do to fend off rodents sweet little bunnies, swarms of locusts, the stealthy possum and grow food in drought combined with searing heat.  One thing you do learn early on in Texas gardening is when the tag on the plant says 'full sun' it hardly ever means 'full Texas sun'.  Is it any wonder I rely on the local markets for my produce? 

I do love to cook.  I love my kitchen! I love chopping, kneading, baking, grilling and most of all- eating!  So what if this was not my reality:


I can still enjoy veggies!  Luckily, my kids love them as well, and my poor husband who was raised by someone who's cooking skills shall we say....were lacking?....has come around to crave them as well. 

Monday, August 9, 2010

"Every Leaf Speaks Bliss To Me, Fluttering From The Autumn Tree" Emily Bronte


I'm not sure if it is all of the 'back to school' ads, or if it has been the 16 straight days of temperatures over 100 degrees, but right now I am looking forward to fall.  I decided to make this fall leaf garland from some of the old books I have and post it as a tutorial for any other like-minded individuals out there.


Like most of my other projects it is fairly quick, inexpensive to make, and an  easy skill level.  After all, we are busy modern women with a lot to get done in a day :)


You will need just a few materials that you probably have on hand:

an old book
2 or 3 coordinating scrapbook paper or cardstock
light gauge wire (mine was 26 gauge floral wire)
white glue or modge podge
foam brush
sharp scissors
wire cutter
ink pad in a coordinating color
heavy twine
raffia or ribbon
large beads 
I also coated my finished leaves with matte clear acrylic spray


You can use your own, or print out my

I used the leaf patterns I marked 'A' - 'B' - 'C'
For leaf 'B' I printed out the image at 50%.

Once you have decided which leaves you want to use, stack 3 or 4 pages you have torn from your book, and use your template as a cutting guide.  You will need to flip them over and determine which side you like the look of best, given the cuts and the printed words.

Loosely cut the shape from your scrapbook paper.  Clip pieces of wire that will fit in your leaf size.


I used white glue thinned with a small amount of water, but modge podge will also work.  Just spread some with your foam brush on the back of the loosely shaped scrapbook paper piece you have cut.  Add the wire in the appropriate places and stick your book-leaf down smoothing the edges and making sure the paper is pushed tight against the wire pieces.  Don't freak if the wire sticks out a little bit- you can trim it with your wire cutter later.


Should look something like this:


I set my leaves in the sun to dry, which here literally took about 3 minutes.  It worked well to stick a leaf and put it in the sun to dry while I was prepping another.  The wire inside adds a nice stiffness and bendability to these.


For this garland I chose a fall color theme, but I plan to do one just for my Halloween decorations.  Here is a picture of each:


All My Best

Telling People What I Think For 40+ Years!!

Blog Advertising - Advertise on blogs with SponsoredReviews.com