Crafty Moose gone wild!

Welcome to the Ticklish Moose blog!

Be sure to visit my webstore for some great freebies, as well as Ticklish Moose merchandise:


http://www.ticklishmoose.com/

Creative License

Creative Commons License
All Shown On This Blog by Ticklish Moose is licensed under a Creative Commons Attribution-NonCommercial-ShareAlike 3.0 Unported License.
Permissions beyond the scope of this license may be available at http://www.ticklishmoose.com.

Search This Blog

Wednesday, July 13, 2011

Odds and Ends


In all my years of thrifty finds- this is one of my all time favorites!
It is 40" x 40" square and still has the World Market tag on the back!  I think it is going to look great in my daughter's new apartment.  


I am having a melancholy day.  My little doggie is at the hospital getting oral surgery and my nephew may or may not be in the people hospital after a nasty car accident on the freeway.  My oldest sister does not seem to have the ability to use any modern methods of communication including but not limited to the phone, texting, email or smoke signal.  So I am sending out a little prayer for you Tim and hope you are doing OK.

I am working on a super-secret project that I will do a tutorial on after the recipient has gotten it and it's not a secret any more  :)   This is a cabin-fever time of year for me because the heat and intense UV rays keep me from being outside too much.  You would think I would get a lot done, but I spend time obsessing on things......Like this chair:
I bought this chair and ottoman 13 years ago at a great price to fill a big corner of the library of our old house.  It is really large, not super-comfy but not bad either.  I just keep thinking it could be more "me".  But look at all of those furniture tacks!  I just don't think I have it in me to completely rip into this, plus the leather is in perfect shape, as the chair has not had any heavy use.  I have been toying with the idea of just re-doing the bottom cushion, the arm pads and the loose back pillow.  I would like to do a foam core with a down wrapped seat so that it had more of the feel my Uncle Charlie's antiques had.  So it would envelop the person sitting in it more.


I am also considering making my own fabric design for the back pillow, and toying with a few ideas:


So now you know my intentions.  We'll see what happens in the end.  ;-)

Tuesday, June 21, 2011

Ribbon Storage Idea- A 1 Hour Craft

Do you ever spend way too much time looking for something to fulfill a storage or space requirement and then think "duh.....I can just MAKE that!" ?

I have had this idea for vertical ribbon storage for some time now.  I kept thinking about possibly modifying a paper towel holder but the bases are typically too large.  Then the other day I was clearing out some stuff from a shelf in the shed and realized I had everything I already needed!  Booyah!

This is what it looks like completed


This is the pile of junk supplies that started the process


I also used some wood glue, a little 220 grit sandpaper, black spray paint, and ended up using a wooden spool on the top.  My husband was nice enough to put together a cute little power tool kit just for me..........guess he got tired of the endless 'honey-do's' and looking for his tools  :)   So I got to use my awesome new cordless drill on this project!  
The 2 inch diameter wooden disc is a cedar block that had lost it's scent.  Any size piece of wood would work as long as it is larger than the wheel.  The hole in the wheel was not quite large enough to push the dowel into, so I used my handy drill to make the hole the correct size, added a little glue to the bottom edge of the dowel and stuck them together.


Then I just glued the disc to the top of the candlestick, and the wheel with dowel attached to the disc.  I let the whole thing dry about an hour.

Sunday, June 12, 2011

Dyed to Match Buttons- Who Knew??


Evidently, dye is not just for fabric!!  I wanted to share a tutorial I ran across yesterday that really opened my eyes to some new possibilities.


 This tutorial comes to us from Rit dye, but of course you could probably experiment with some products you had around the house as well.
And- if it dyes plastic and nylon......well, just think of the things that could use a facelift!! 


Dyed Buttons


Whether you are a crafter or a sewing fashionista, you will enjoy dyeing buttons. It’s fun and easy to do. Most white buttons are made out of nylon or some type of plastic. Rit is one of the few dyes that will color these materials. That means you can transform ordinary buttons into colorful accents that match or coordinate with whatever you are making.
Assorted White Buttons before dyeing


Muffin pan doubles as a button organizer when working on craft projects

Rit Dye colors shown:
  • Top: Fuchsia, Lemon Yellow, Violet
  • Bottom: Sunshine Orange, Evening Blue, Scarlet


Buttons add a colorful accent to flower arrangements!


Rit Dye colors shown:
  • Lemon Yellow, Golden Yellow, Sunshine, Orange, Apple Green

 Ready to get started??


Saturday, May 14, 2011

Thrifty Tissue Paper Lampshade (a tutorial)


I haven't asked you to make me young again. All I want is to go on getting older.
- Konrad Adenauer


That quote sums up a lot of my feelings on the process of repurposing and upcycling items and clothing.  I do not like the "throw away society" that we have become.  I guess some of that comes from my age- after all, "back in MY day" when your TV broke you could take the back off, remove the tubes, go down to the corner grocery to test and replace the faulty parts.  I love taking things that still have some life in them, and bringing them into this decade.


I have become obsessed with vintage images and image transfer.  And I especially love bringing those long-forgotten images forward and creating something natty contemporary.  


 Here is the latest and greatest "after"


But ya gotta get there, right?  So- let's do this thing!!


Start with one sad old lamp
My lamp is small with a vinyl-covered shade.  This process would work for most any flat surfaced (non-pleated) shade.  I simply downloaded this image from Graphics Fairy 


Karen has 1000's of free images to use- and I go to her site often  :)

I also used this image  (quote) I found on the internet to build on, so to speak:
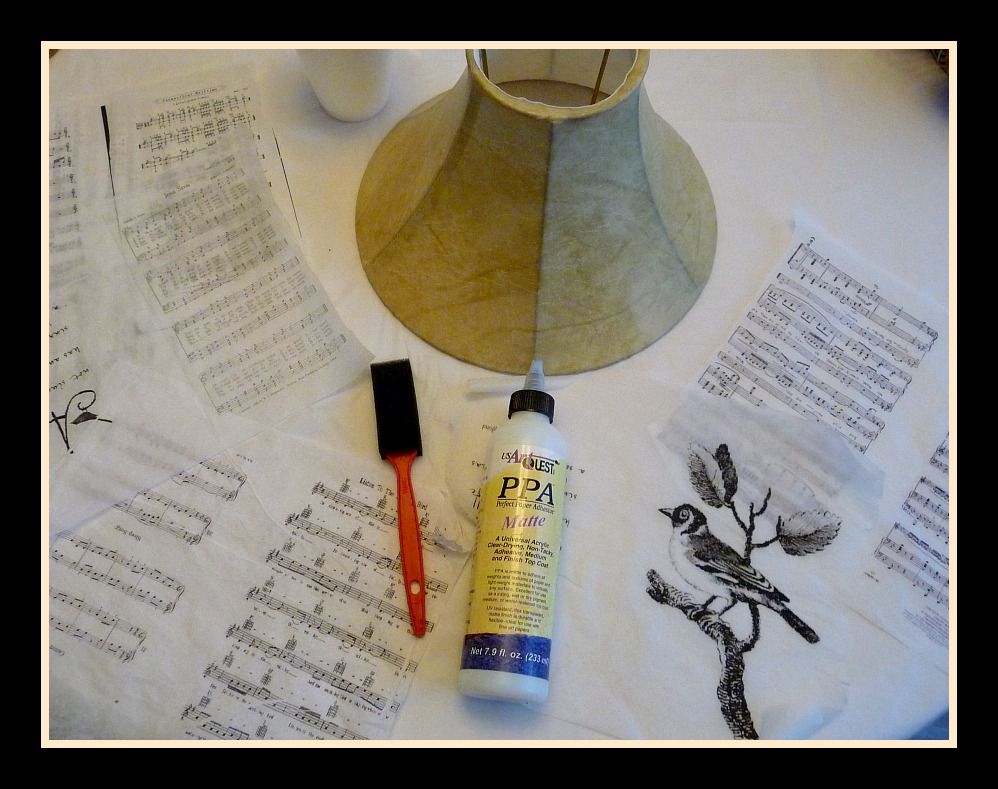
I also went online and found sheet music for 'bird themed' songs.....you know, like Rockin' Robin, Black Bird, Mockingbird, etc.   Since my lampshade is just 7" high, I used Publisher to combine/print 2 images per 8 1/2" x 11" sheet of paper.  I wanted the light to shine through the images, so I printed them onto tissue paper.


Here is where the word *tutorial* pays off for you- because I get to spare you a bunch of frustration and cursing sobbing.  

  1. get some 1/2" wide 2-sided tape (you may use this already for scrapbooking)
  2. use plain cardstock paper, not textured (8 1/2 x 11)
  3. use cheap old tissue paper- not the kind with a *nice* glossy side
  4. if possible, print your images with a laser printer or use a copy machine.  The toner-based inks do not run when you get them wet with decoupage medium.
DO NOT BELIEVE the other blogs that tell you that you can somehow stick the tissue paper with spray adhesive to the cardstock and run it through and come up with something usable in the end.  THEY LIE!!!!!

Use this simple, Ticklish Moose Tutorial Tip, which makes it so simple you will laugh out loud....ready??  Bwaa-haaa-haaa!!  

 Tutorial Tip:
Simply adjust the size of your image so you have a decent 3/4" to 1" of margin space outside of the actual image you want to use.  Stick the 1/2" wide piece of 2-sided tape across the leading edge (end that feeds into the printer) of the cardstock.  You can use 2 smaller pieces on the  other end just to keep the tissue paper nicely in place as it feeds through the printer.  You can smooth out (or lightly crumple up) the tissue over top of the taped cardstock.  Flip it over and trim off any excess tissue paper.   Put the tissue paper covered cardstock into your printer so you print on the tissue paper side.  Print your image and voila`...... you did it!!  Carefully tear off your printed page.

Repeat as many times with the cardstock as you need images.
I used 6-7 printed sheets for my small shade (I had a few scraps leftover)


Gather up your printed pages, a foam brush and whatever decoupage medium you prefer.  I used PPA for this application.


Friday, April 22, 2011

The Road To Hell Is Paved With Good Intentions?

Gosh.......I hope not!


Because lately it seems I have the best of intentions to get things done, and they just do not materialize.  I am still nursing a swollen spleen and the fatigue from chronic/remitting Epstein-Barr, but my spirits are good overall.  I do get somewhat depressed because I do not know how many times I can repeat this cycle before I become bedridden, but I do still have hope that the many prayers floating around out there will give me Divine strength and healing.  So don't give up on me just yet! 

Evidently- from several emails I received over the weekend- I did not get something quite right on my Linky and there was an issue with the hook-up, so I will try to remedy that this week and try again.  I had set it up ahead of time since my sister was coming to visit, and did not get a chance to check it out on Saturday as we were a little bit busy.  

On Friday we set out on our annual trek to an event called Antique Alley about an hour South of where I live.  We had a VERY strong cold front blow through on Thursday evening that missed my area, but hit the Cleburne area quite hard.  A lot of vendors get set up the evening before the event, as you can imagine, and they sustained quite a bit of rain and hail damage.  But, to add insult to injury on Friday the winds were exceptionally strong- with gusts to 40 mph!- and we witnessed whole tables being flipped over and numerous glass breakage and VERY frustrated sellers. We did take refuge for awhile at Whipp's Farm that did provide some breaks from the wind and got some great deals as well!  Here are a few pics from Whipp's:


I got several nice items from Whipp's Farm!  My favorite was this sweet little box for $3


The best part came when I opened it!


 Surprise!  It was filled with Bible verses!!


This is the first one I picked out of the box:


I also got some awesome antique books and one new hymnal.  Most were from 1902-1903.  This sheet music is from 1940..Use as ephemera for your craft projects, or just print it out and frame- but this is especially apropos!


Remember the 'reason for the season'.....I consider Easter the holiest day!  Christ is Risen!!  

Have a Blessed Easter holiday! 

All My Best

Telling People What I Think For 40+ Years!!

Blog Advertising - Advertise on blogs with SponsoredReviews.com