The weather outside is delightful these days. But, being December it is not destined to last. We have had a very mild and dry fall. Most of our trees still have not turned colors. It seems strange to have green leaves on many trees, and Christmas decorations everywhere. I grew up in Michigan in the crook of the thumb and when I lived up there the first 20 years of my life winter meant SNOW! Lots and lots and lots of snow. Truck it down by the Tittabawassee and maybe by June it would be all gone.
The extraordinary diversity of Texas includes 10 climatic regions, 14 soil regions, and 11 distinct ecological regions. Here in North Central Texas we have 4 distinct seasons. That means lots of clothes for everything from zero to 110 degrees!! We are blessed with a long *flip flop* season, but we definitely also use warm coats, hats, gloves and boots. Which brings me to this weeks tutorial. It is a fast, fun upcycle which has a million possibilities for customization and personalization, and it is totally wearable, too!
Isn't this the cutest headband ever??
(Not so sure I'm giving this one away)
Here is my finished project:
Once you see how simple these are to make, and basically free, you will never spend $$ to buy one again! I am totally working on the matching scarf!
Okay- this looks like a lot of steps, but hang in there.....once you get the pattern made it goes really fast.
Gather some supplies:
I used an old pair of grey sweatpants that no longer fit anyone, and a scrap of red polar fleece left over from another project. I am also considering using the wording area from a sweatshirt that no longer fits, and a felted sweater. I hope to have some of those made to show you before Christmas, but no promises. If you make one, I would love for you to email me the pics, so I can add it to the blog for others to see :D
You will need basic sewing skills, basic sewing supplies, some paper to make the pattern (I used legal sized printer paper), and freezer paper for the stencil.
I started by freehand sketching a basic headband shape on a piece of legal paper:
To make it come out even, fold in 1/2 width-wise, then fold in 1/2 length-wise, and refine the shape when you cut it out. Use your sketch lines as a guide:
Here is the first part of the pattern cut out:
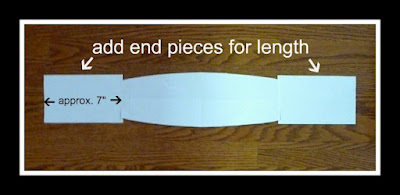
Add some ends to make it long enough:
Trim it to smooth out the shape:
Now you have your pattern! Cut one of your top fabric (mine is the grey sweats) and one of the lining (mine is red fleece). Be sure you cut your length with the stretch of the fabric! I cut out a test pattern from some scraps of plaid fleece just to be sure I liked the size of the band on my head. I have a pretty *average* sized head, so my pattern size should work for *most* everyone. If you are the *Big Head* person in your family, (you know who you are) you may want a slightly wider band.
Here is the part that took me forever the most time.....picking the graphic! Lucky you- you can copy my design if you want!
You are welcome to download a copy here:
When I printed it, I used the 'landscape' paper setting, letter size paper, and I 'justified' or stretched it to the length of the paper.
I traced the design loosely onto my freezer paper. If you want, you can print on the freezer paper. I wanted to be able to trace it more than once.
Carefully cut out your design, and iron it onto your fabric, using the 'wool' setting on the iron:
I used VersaCraft ink for fabric in black. I blotted it on, using my fingers under the fabric to get the edges of the design darker. You could also use paint for fabric, or add a textile medium to acrylic paints. Just be sure to heat set after it has dried.
I used basic hand sewing stitches to add details. Using a technique of Alabama Chanin, I used the knotted ends as decoration instead of hiding them underneath.
Almost done..... :)
Pin the right sides of your headband together
Sew both long sides with a small zig-zag stitch, so you can get some stretch without breaking the stitching. Leave the ends open so you can turn it right side out.....okay.....now take out your pins and turn it right side out!
If you feel the need to press, just be sure not to press the polar fleece side. It smashes it flat :(
Fold over one 'tail' and you may need some help at this stage to get it pinned in place near the center back to fit your head. I just fussed around and stuck myself in the back of the head a few times, until I got it right ;-)
I finished the headband off by sewing a little rectangle area to decorate with some red buttons I had on hand. That way when I have my hair up in a pony tail or messy bun it also looks cute in the back! Trim off the excess- you don't have to worry about fraying :)
Sewing through all those layers was by far the hardest part, and next time instead of just pinning it in place, I may also hand baste to make this part go a little easier.
That's it!! You have a cute, personalized headband you can give as a gift (or keep for yourself!) for no money. I have more of the polar fleece, and so I truly am going to work on a matching scarf. :D
Now....get to work!!


I totally wore my flip flops today. High was in the 70's. 40's for tomorrow.
ReplyDeleteLove that headband!
Glad you found my Texas Blogging Gals! You will be on the next updated list. Enjoyed a first visit. Following you now.
ReplyDeleteWow...I read your profile. What a testimony.
Come see me at my personal blog, too, real soon.
www.dfseason.blogspot.com
So happy to have you join the party and glad to have "found" your blog!
ReplyDelete~Gay~
itsahodgepodgelife.blogspot.com
How sweet! What a lovely handmade gift! Fabulous job!
ReplyDeleteThanks for linking up to Making It With Allie! I can't wait to see what you have for next week!
AllieMakes.Blogspot.com
SO COOL. I am going to have to try that....
ReplyDeleteThis headband is so cute! I think some of techniques used would still be a little too tricky for me but I will definitely book mark it for the future. Thanks!
ReplyDelete