Crafty Moose gone wild!

Welcome to the Ticklish Moose blog!

Be sure to visit my webstore for some great freebies, as well as Ticklish Moose merchandise:


http://www.ticklishmoose.com/

Creative License

Creative Commons License
All Shown On This Blog by Ticklish Moose is licensed under a Creative Commons Attribution-NonCommercial-ShareAlike 3.0 Unported License.
Permissions beyond the scope of this license may be available at http://www.ticklishmoose.com.

Search This Blog

Showing posts with label handmade. Show all posts

Wednesday, August 1, 2012

Summer Sandals- As Seen on AllFreeHolidayCrafts.com


 I think quite a few of you have seen these 'home-made' summer sandals or some variation there-of, although most I have seen were flip-flop styled.  I am reposting a GENIUS idea from a blog called annekata. These are so wonderful for all of the ladies (and kids!) out there that just can't stand the thingy-between-the-toe!

I found them on a site called AllFreeHolidayCrafts.com


Enjoy!

Friday, July 13, 2012

Button, button....

who's got a button?  ME! 
As usual- it's been a busy few weeks.  I helped my daughter get moved into her new apartment, fixed up a few frames for new apartment, helped pick new furniture for new apartment, and on Sunday I will (probably) help hang frames and shelves in new apartment. (whew!!)  So who on Earth has time for any crafting?? Well.....ME!

Kinda.

I have been fascinated with buttons of all kinds for a long time, and as you can imagine, I have a fairly substantial button collection.  So it seemed a natural progression to make a few of my own!  This go-round I am using Premo` polymer clay, but I'm pretty sure I will try my hand at a few wooden buttons before it's all said and done.

 This group of buttons (and a heart-shaped pendant or two) is from one small package of Premo`.  I experimented with a few different kinds of cutters and embossing tools to get a feel what worked and what didn't.


Here is what I found so far:
  • actual 'cutters' work best
  • stamps or embossing plates with deep, small impressions give the best detail/results
  • use a toothpick or fine knitting needle to poke the holes
  • poke the holes from both sides


I used Stazon black ink to highlight (is that the correct word?) the detail on one button after it had baked and cooled, then painted it with latex paint from one of those little jars I told you about, and lightly rubbed the wet paint back off to show some of the black details through the blue paint. 
I plan to try a few more paint and topcoat combos on the rest of the buttons in a few days when I have a little more time to get out "the works" and play.
I'll be sure to show you the results!

Wednesday, June 20, 2012

Shabby Clothespins

I have the start to a bigger project.  Not sure where that is going, but I do know it is starting with these shabby chic clothespins I just painted!


I picked up a sample jar of Benjamin Moore paint in gossamer blue.
Truth be told I love those little jars of paint, and may have picked up a few other colors on that hardware store trip.  It is a little more grey than the sample shows, and the color I wanted the guest bath to be which somehow I painted more aqua but that is a story for another day.

 I started by taking the clothespins apart and lightly sanding them.  The large pins are vintage, the little ones are new.  The button is one of a large group of painted wooden buttons I am not all that fond of, and figured 'why not' change them?  I painted the top and sides, let dry, painted the backs, let dry, and then gave a second coat to the tops.  Did some laundry while the paint dried.


I used a French script stamp and black ink to stamp the images on the top side of the clothespins, then heat set.  I lightly sanded the top and edges of the clothespins with 320 grit sandpaper and gave them a quick top coat of acrylic varnish.  I let them dry overnight and re-assembled the clothespins.


I'm still working out the details on the
'bigger project' they will be a part of, 
but for now I am just using them in
every little way I can think of! 


I plan to try these in a few other
colors as well, because.....you
know, I just love those little jars
of paint!

Friday, May 11, 2012

Trellis Something Good

I don't want you to think a week has passed that a project has not been started or completed at our home.  In fact I was just thinking the other day that more days than not you will probably find a nail gun instead of dinner on the dining room table.  We had some exceptional weather this past week, and we took full advantage of every single day of it!  It won't be long before it will be too hot for me to be outside after about 10 AM.

I'm sure if you have a garden, or even a patio you have priced a trellis.  They come all shapes and sizes, and of course price ranges.  We have a large shallow garden area on the lower patio/fire pit portion of our back patio that had bushes at one time, but we found it hard to keep them from encroaching on the patio itself.  We decided to tear out the bushes and add vines- primarily evergreen varieties that would keep the leaf debris cleanup to a minimum.  And let me add that the space gets the full Texas sun all afternoon.  I honestly get fed up with publications that show amazing gardens grown places like Washington state!  It takes True Grit to garden here as well as a modicum of masochism! 

Our trellis needed to be over 10 feet long and 5 feet high!  We are so fortunate to have been able to recycle cedar scraps from a work project!  I still plan to add some vertical strings to help coax the vines to fill in.  My son cut out, sanded and assembled it since my husband still does not have use of his arm.  I think it turned out great!

 
 I also took advantage of the shade from our large oak tree in the back yard to work on and paint an old chair.  I should have the project fully completed for the next post! (pending no continued rain-out)

Here is a peek:


A pic of my kitty enjoying the catnip I planted for her


And to keep with our wood/fence/outdoor theme today here is a great free background for your personal use


And to all the Moms out there- Happy Mother's Day!

Tuesday, April 3, 2012

Opportunity Can Ring My Bell

I have a confession.  An ugly one.  This was my doorbell.


Please be clear....I have tried and tried to do better.  I just haven't been able to find something that was 'me'.

Some options I have explored:


Or possibly???


NO!!!!

But you can see my dilemma.  

Then you know how sometimes two things can just somehow come together in your mind?  Boom! A tutorial was born!!

Simple, pretty and quick.
And we get to play with electricity!

 
Here is all you will need 

An unfinished wooden switchplate
Mod Podge (I used outdoor)
A lovely paper napkin 
Gesso or primer
180 grit sandpaper
Sponge applicator
Screwdriver and/or cordless drill
I also bought a new dark brown cheapo doorbell,
but you could repaint the one you already have if need be


 Lightly sand and gesso or prime the wooden switchplate


I made sure my screw holes lined up correctly (bonus- they did!) and lightly traced where the doorbell housing would go so I could estimate the amount of space I would have left for the design of the napkin to show.  I picked up these lovely spring napkins at Tuesday Morning for $1.70

Once you figure out what part of the napkin you want to use spread a thin coat of Mod Podge on the switchplate.  You are going to get one shot at sticking down the napkin, so hold your breath and bite your upper lip.  Separate the layers of the napkin and just stick the pretty part on.


Smooth it out and tear or cut off the excess.  Add a layer of Mod Podge to the top.  Let dry a few hours and top coat again.  Now the hard part.....walk away for 72 hrs to let it completely cure.  Use a craft knife to cut paper away from the holes in the backplate.


When the wait is over the fun part starts- playing with live wires!
Remove the screws holding the doorbell.  There should be 2 wires connecting it.  Loosen the little screws on the back that hold the wires and carefully remove each one, being sure they do not come in contact with each other.

 Pull the wires through the middle hole of the switchplate, making sure the ends do not touch each other!  Use a screw or find a third hand to hold the plate on the wall while you pick up your doorbell.


 Reconnect the wires to the (new) doorbell and screw it back onto the wall.
I plan to do a different 'theme' for each season, but for now I am just happy to have this to greet my guests!


Happy Spring!!

Monday, January 23, 2012

Scarf Project


Scarf Project, originally uploaded by ticklish_moose.
Okay.....about a week and a new laptop later at least I can get my picture posted. Hoping to have the photo edits done for a tutorial soon, but I may just move on at this point, ya know??

Wednesday, December 21, 2011

Thrifty Tiny Trees

Just taking a little break from the holiday madness to show you a little tree display I whipped up a week or so back.  I saw these expensive mini potted trees in a catalog that shall remain nameless (hint- rhymes with bundt cake).


You are reading it right- just under $100.  I wonder if they will throw in some free shipping??  


I spotted a group of mini trees at Hobby Lobby this season for 50% off of $3 each.  Now you're talkin'.....

I used a few cans I had cleaned and saved- a soup can, a large size bean can, and an International Coffee can.  I covered them with black and white damask wrapping paper and finished them off with some ribbon I liked.  I did have red velvet ribbon and the crystal buckles but for my vignette I decided on something a little different.  

It took less than an hour and total cost was conservatively less than $10.


I think they turned out cute!  

Merry Christmas!

Sunday, October 23, 2011

Bad Blogger is Back With a New 'Old' Lamp Project!

What can I say?  It's been a busy past few months!!  My son returned to High School and so we had to get back into the 'school routine', my Rheumatologist had me try a new medication which did not agree with me at all.  As a matter of fact, lets just say short of my anaphylactic reaction to a few other medications I have had in the past, it ranked right up there on the 'bad experience' scale.

I also got a new great-niece!  After 40 hours of labor (yes- you read that right!)  beautiful (and not just because she is 'ours') baby Arwen was born!


Then I went on an 'antiquing' trip to MI, got some fabulous things, got sick from being stuck in that sardine can they call flying coach, and just barely had time to whip up a fall project!   I tend to decorate for fall, not Halloween.  I don't have any small children and the fall theme takes me through Thanksgiving.


Lately it seems, I have had a 'thing' for lamps.  I don't know why.  Possibly because they are plentiful and inexpensive.  One thing for sure- I will never pay full price for a lamp or shade again!

So here is my 'latest' new 'old' lamp project:


But- as usual- we gotta get there, right?  

I recently bought the barley-twist lamp in the photo at our neighborhood garage sale for $3.  I switched out the shade for a narrower one I had on hand from a different lamp I was not currently using so I could group the lamps together.  I think it makes for a kinda neat display  :)

The 'project' lamp is an old, sad 8" tall (minus the shade) glass lamp I got at the local thrift for $4.49.  You know the kind- popular in the 1980's.  Depending on your age, you may already have one around the house  ;-)
Be sure to look at the bottom to see that it is easily taken apart by undoing the wing-nut that holds the threaded rod that goes up the middle.  Just undo it, loosen the cord up through the lamp and you are ready for spray paint.


 I used black satin spray paint and put a little blue tape around the cord to keep the paint off.  Paint the base, and the brass-colored threaded rod that goes in the center.  Of course, you can use whatever color suits you and your project.  Clean the glass and get ready to fill it up!  You could use pine cones, acorns, candy corn.....I chose these cute mini pumpkins and threw in a few small pine cones from my stash.

Sunday, August 28, 2011

Owlies- A Free Owl Pattern and Tutorial!

I am one of those people blessed with great family members.  Not to say we don't have our issues, fight now and then like families do or have a weirdo or two (which I am convinced is NOT me).  But all in all, through thick and thin we love each other to pieces.

So imagine my delight at finding out that one of my nieces was expecting a baby.....and a girl at that!  You know, I do love all things girly.  And who can resist a sweet little baby?  Unfortunately, my niece is full-term and has been in the path of Irene, but baby stayed put (whew!) and the power is back on in their area.  You know how the end of your pregnancy is.  And you can imagine she was thinking "Seriously?!? A freakin' HURRICANE?"

Well, enough of that.....back to me.

I wanted to make something special for baby, and much to my delight the 'theme' was owls, and the color of the nursery was to be green and brown.  I had seen a cool mobile some time back and had been wanting to try one- I just knew it was the project for me!  Originally I was going to attach the owlies by ribbons to a wooden embroidery hoop, but soon became obsessed with making it musical as well.  I scoured all of the local thrifts for gently used baby mobiles to no avail.  I was running out of time when I stopped into a Kid to Kid store to see what they had.  And wouldn't you know it- amongst  the pink Care Bears  and blue Cars mobiles I found this:


The perfect base for my newest creation!  
Couldn't wait to cut those sports figures off!!


I could not find an owl pattern anywhere that was exactly what I needed, so I made my own.  Feel free to download and use it, but please give a link back or shout out-K?  


Download Full Size Pattern Here


Suitable materials for this project are felt (wool or poly), suede or leather (I upcycled some old jackets), suit weight woolens (once again, I upcycled), quilt weight cotton for the tummy, and whatever buttons, embroidery threads, ribbons, etc. you would like to add.  I stuffed mine with a high quality poly fluff filling and sewed it on the machine, but you could easily also sew these by hand with a blanket or back stitch.


Cut out the pattern pieces from whatever fabrics you have chosen.  I used fusible web on the back of my cotton tummy piece to hold it in place while I stitched it on, and used a decorative stitch, but that is your discretion. 


Tuesday, June 21, 2011

Ribbon Storage Idea- A 1 Hour Craft

Do you ever spend way too much time looking for something to fulfill a storage or space requirement and then think "duh.....I can just MAKE that!" ?

I have had this idea for vertical ribbon storage for some time now.  I kept thinking about possibly modifying a paper towel holder but the bases are typically too large.  Then the other day I was clearing out some stuff from a shelf in the shed and realized I had everything I already needed!  Booyah!

This is what it looks like completed


This is the pile of junk supplies that started the process


I also used some wood glue, a little 220 grit sandpaper, black spray paint, and ended up using a wooden spool on the top.  My husband was nice enough to put together a cute little power tool kit just for me..........guess he got tired of the endless 'honey-do's' and looking for his tools  :)   So I got to use my awesome new cordless drill on this project!  
The 2 inch diameter wooden disc is a cedar block that had lost it's scent.  Any size piece of wood would work as long as it is larger than the wheel.  The hole in the wheel was not quite large enough to push the dowel into, so I used my handy drill to make the hole the correct size, added a little glue to the bottom edge of the dowel and stuck them together.


Then I just glued the disc to the top of the candlestick, and the wheel with dowel attached to the disc.  I let the whole thing dry about an hour.

Sunday, June 12, 2011

Dyed to Match Buttons- Who Knew??


Evidently, dye is not just for fabric!!  I wanted to share a tutorial I ran across yesterday that really opened my eyes to some new possibilities.


 This tutorial comes to us from Rit dye, but of course you could probably experiment with some products you had around the house as well.
And- if it dyes plastic and nylon......well, just think of the things that could use a facelift!! 


Dyed Buttons


Whether you are a crafter or a sewing fashionista, you will enjoy dyeing buttons. It’s fun and easy to do. Most white buttons are made out of nylon or some type of plastic. Rit is one of the few dyes that will color these materials. That means you can transform ordinary buttons into colorful accents that match or coordinate with whatever you are making.
Assorted White Buttons before dyeing


Muffin pan doubles as a button organizer when working on craft projects

Rit Dye colors shown:
  • Top: Fuchsia, Lemon Yellow, Violet
  • Bottom: Sunshine Orange, Evening Blue, Scarlet


Buttons add a colorful accent to flower arrangements!


Rit Dye colors shown:
  • Lemon Yellow, Golden Yellow, Sunshine, Orange, Apple Green

 Ready to get started??


Saturday, May 14, 2011

Thrifty Tissue Paper Lampshade (a tutorial)


I haven't asked you to make me young again. All I want is to go on getting older.
- Konrad Adenauer


That quote sums up a lot of my feelings on the process of repurposing and upcycling items and clothing.  I do not like the "throw away society" that we have become.  I guess some of that comes from my age- after all, "back in MY day" when your TV broke you could take the back off, remove the tubes, go down to the corner grocery to test and replace the faulty parts.  I love taking things that still have some life in them, and bringing them into this decade.


I have become obsessed with vintage images and image transfer.  And I especially love bringing those long-forgotten images forward and creating something natty contemporary.  


 Here is the latest and greatest "after"


But ya gotta get there, right?  So- let's do this thing!!


Start with one sad old lamp
My lamp is small with a vinyl-covered shade.  This process would work for most any flat surfaced (non-pleated) shade.  I simply downloaded this image from Graphics Fairy 


Karen has 1000's of free images to use- and I go to her site often  :)

I also used this image  (quote) I found on the internet to build on, so to speak:
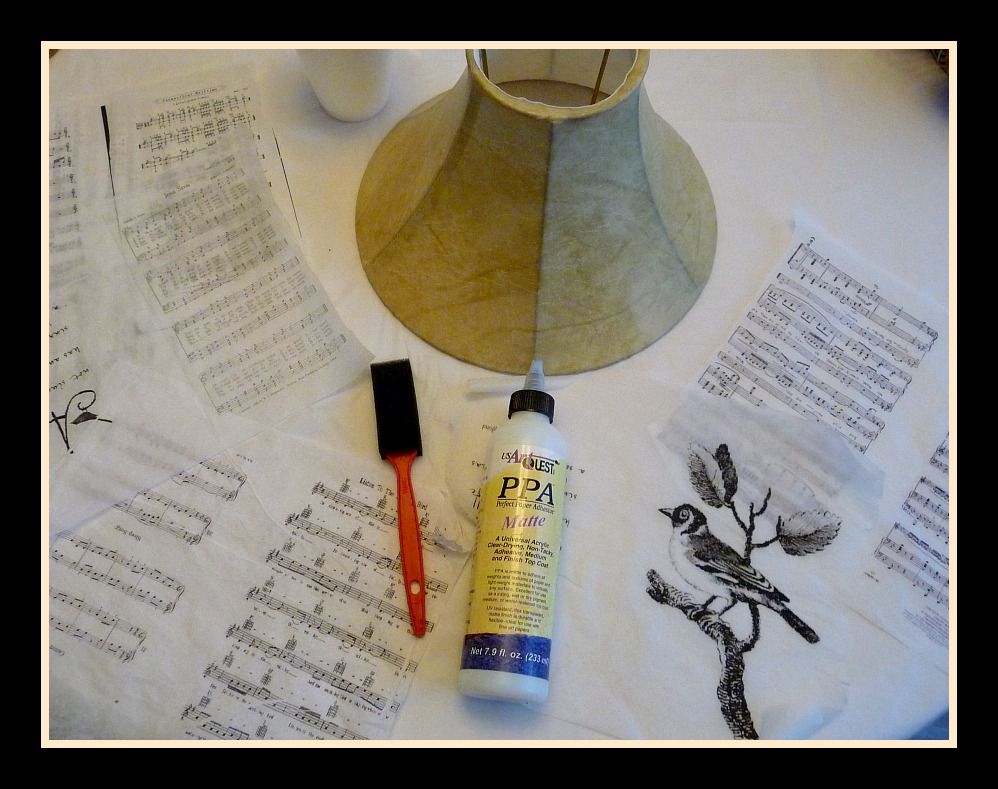
I also went online and found sheet music for 'bird themed' songs.....you know, like Rockin' Robin, Black Bird, Mockingbird, etc.   Since my lampshade is just 7" high, I used Publisher to combine/print 2 images per 8 1/2" x 11" sheet of paper.  I wanted the light to shine through the images, so I printed them onto tissue paper.


Here is where the word *tutorial* pays off for you- because I get to spare you a bunch of frustration and cursing sobbing.  

  1. get some 1/2" wide 2-sided tape (you may use this already for scrapbooking)
  2. use plain cardstock paper, not textured (8 1/2 x 11)
  3. use cheap old tissue paper- not the kind with a *nice* glossy side
  4. if possible, print your images with a laser printer or use a copy machine.  The toner-based inks do not run when you get them wet with decoupage medium.
DO NOT BELIEVE the other blogs that tell you that you can somehow stick the tissue paper with spray adhesive to the cardstock and run it through and come up with something usable in the end.  THEY LIE!!!!!

Use this simple, Ticklish Moose Tutorial Tip, which makes it so simple you will laugh out loud....ready??  Bwaa-haaa-haaa!!  

 Tutorial Tip:
Simply adjust the size of your image so you have a decent 3/4" to 1" of margin space outside of the actual image you want to use.  Stick the 1/2" wide piece of 2-sided tape across the leading edge (end that feeds into the printer) of the cardstock.  You can use 2 smaller pieces on the  other end just to keep the tissue paper nicely in place as it feeds through the printer.  You can smooth out (or lightly crumple up) the tissue over top of the taped cardstock.  Flip it over and trim off any excess tissue paper.   Put the tissue paper covered cardstock into your printer so you print on the tissue paper side.  Print your image and voila`...... you did it!!  Carefully tear off your printed page.

Repeat as many times with the cardstock as you need images.
I used 6-7 printed sheets for my small shade (I had a few scraps leftover)


Gather up your printed pages, a foam brush and whatever decoupage medium you prefer.  I used PPA for this application.


Wednesday, April 6, 2011

Spring Graphics Freebies


This week should have been easy, but has gone South in a hurry.  At least it's hump day!  


Good news!
The *new* (to me!) scanner I picked up at the garage sale has been great and so easy to use!  I never could get our old all-in-one machine to work with my laptop correctly.  I am not an IT genius so if it ain't simple it ain't happening! 

I wanted to share a few of the spring graphics I scanned for you to use if you choose.  I also wanted to share a few pics of some things I have been working on.  I couldn't remember if I had posted this cuff previously on the blog.  It was a cuff from a silk blouse, and I added flowers upcycled from an old lei and various vintage buttons and beads from my (vast) hoarde collection:


This next little project started as a horrible forest green box with runs and smears (sorry whoever's kid made it for them!).  I added a black distressed finish, some decoupage and made some funky pulls out of mini spools and buttons.  I added the chicken wire for fun!  I think it turned out great:


I love toile! 


The next picture group is a set of lavender sachets I whipped up.  The images printed on muslim are saved on a Publisher Document, so I could print 4 to an 8 1/2 x 11 piece of fabric.  I used the same technique as when I printed on the twill tape- you just use a temporary adhesive to stick the muslim to a piece of cardstock, and print directly onto your fabric from your printer.  Just be sure to heat set (from the backside!).


These were made simpler by starting with a 5" Moda Charm Pack:


The white wire basket was one of my garage sale finds from last week!

All My Best

Telling People What I Think For 40+ Years!!

Blog Advertising - Advertise on blogs with SponsoredReviews.com