Crafty Moose gone wild!

Welcome to the Ticklish Moose blog!

Be sure to visit my webstore for some great freebies, as well as Ticklish Moose merchandise:


http://www.ticklishmoose.com/

Creative License

Creative Commons License
All Shown On This Blog by Ticklish Moose is licensed under a Creative Commons Attribution-NonCommercial-ShareAlike 3.0 Unported License.
Permissions beyond the scope of this license may be available at http://www.ticklishmoose.com.

Search This Blog

Showing posts with label recycle. Show all posts

Wednesday, August 1, 2012

Summer Sandals- As Seen on AllFreeHolidayCrafts.com


 I think quite a few of you have seen these 'home-made' summer sandals or some variation there-of, although most I have seen were flip-flop styled.  I am reposting a GENIUS idea from a blog called annekata. These are so wonderful for all of the ladies (and kids!) out there that just can't stand the thingy-between-the-toe!

I found them on a site called AllFreeHolidayCrafts.com


Enjoy!

Friday, May 11, 2012

Trellis Something Good

I don't want you to think a week has passed that a project has not been started or completed at our home.  In fact I was just thinking the other day that more days than not you will probably find a nail gun instead of dinner on the dining room table.  We had some exceptional weather this past week, and we took full advantage of every single day of it!  It won't be long before it will be too hot for me to be outside after about 10 AM.

I'm sure if you have a garden, or even a patio you have priced a trellis.  They come all shapes and sizes, and of course price ranges.  We have a large shallow garden area on the lower patio/fire pit portion of our back patio that had bushes at one time, but we found it hard to keep them from encroaching on the patio itself.  We decided to tear out the bushes and add vines- primarily evergreen varieties that would keep the leaf debris cleanup to a minimum.  And let me add that the space gets the full Texas sun all afternoon.  I honestly get fed up with publications that show amazing gardens grown places like Washington state!  It takes True Grit to garden here as well as a modicum of masochism! 

Our trellis needed to be over 10 feet long and 5 feet high!  We are so fortunate to have been able to recycle cedar scraps from a work project!  I still plan to add some vertical strings to help coax the vines to fill in.  My son cut out, sanded and assembled it since my husband still does not have use of his arm.  I think it turned out great!

 
 I also took advantage of the shade from our large oak tree in the back yard to work on and paint an old chair.  I should have the project fully completed for the next post! (pending no continued rain-out)

Here is a peek:


A pic of my kitty enjoying the catnip I planted for her


And to keep with our wood/fence/outdoor theme today here is a great free background for your personal use


And to all the Moms out there- Happy Mother's Day!

Thursday, December 1, 2011

Trash to Treasure!


Trash to Treasure!, originally uploaded by ticklish_moose.
Seems I can't get enough of upcycling chairs!

Like a lot of things over 50 yrs old, this pair of Danish Modern chairs had some creaky joints and were a little rough on the surface. We gave them a complete overhaul (original finish was not salvageable) and instead of being headed for the landfill, they are now headed for my space @ The Antique Gallery of Lewisville!

Sunday, August 28, 2011

Owlies- A Free Owl Pattern and Tutorial!

I am one of those people blessed with great family members.  Not to say we don't have our issues, fight now and then like families do or have a weirdo or two (which I am convinced is NOT me).  But all in all, through thick and thin we love each other to pieces.

So imagine my delight at finding out that one of my nieces was expecting a baby.....and a girl at that!  You know, I do love all things girly.  And who can resist a sweet little baby?  Unfortunately, my niece is full-term and has been in the path of Irene, but baby stayed put (whew!) and the power is back on in their area.  You know how the end of your pregnancy is.  And you can imagine she was thinking "Seriously?!? A freakin' HURRICANE?"

Well, enough of that.....back to me.

I wanted to make something special for baby, and much to my delight the 'theme' was owls, and the color of the nursery was to be green and brown.  I had seen a cool mobile some time back and had been wanting to try one- I just knew it was the project for me!  Originally I was going to attach the owlies by ribbons to a wooden embroidery hoop, but soon became obsessed with making it musical as well.  I scoured all of the local thrifts for gently used baby mobiles to no avail.  I was running out of time when I stopped into a Kid to Kid store to see what they had.  And wouldn't you know it- amongst  the pink Care Bears  and blue Cars mobiles I found this:


The perfect base for my newest creation!  
Couldn't wait to cut those sports figures off!!


I could not find an owl pattern anywhere that was exactly what I needed, so I made my own.  Feel free to download and use it, but please give a link back or shout out-K?  


Download Full Size Pattern Here


Suitable materials for this project are felt (wool or poly), suede or leather (I upcycled some old jackets), suit weight woolens (once again, I upcycled), quilt weight cotton for the tummy, and whatever buttons, embroidery threads, ribbons, etc. you would like to add.  I stuffed mine with a high quality poly fluff filling and sewed it on the machine, but you could easily also sew these by hand with a blanket or back stitch.


Cut out the pattern pieces from whatever fabrics you have chosen.  I used fusible web on the back of my cotton tummy piece to hold it in place while I stitched it on, and used a decorative stitch, but that is your discretion. 


Sunday, June 12, 2011

Dyed to Match Buttons- Who Knew??


Evidently, dye is not just for fabric!!  I wanted to share a tutorial I ran across yesterday that really opened my eyes to some new possibilities.


 This tutorial comes to us from Rit dye, but of course you could probably experiment with some products you had around the house as well.
And- if it dyes plastic and nylon......well, just think of the things that could use a facelift!! 


Dyed Buttons


Whether you are a crafter or a sewing fashionista, you will enjoy dyeing buttons. It’s fun and easy to do. Most white buttons are made out of nylon or some type of plastic. Rit is one of the few dyes that will color these materials. That means you can transform ordinary buttons into colorful accents that match or coordinate with whatever you are making.
Assorted White Buttons before dyeing


Muffin pan doubles as a button organizer when working on craft projects

Rit Dye colors shown:
  • Top: Fuchsia, Lemon Yellow, Violet
  • Bottom: Sunshine Orange, Evening Blue, Scarlet


Buttons add a colorful accent to flower arrangements!


Rit Dye colors shown:
  • Lemon Yellow, Golden Yellow, Sunshine, Orange, Apple Green

 Ready to get started??


Saturday, May 14, 2011

Thrifty Tissue Paper Lampshade (a tutorial)


I haven't asked you to make me young again. All I want is to go on getting older.
- Konrad Adenauer


That quote sums up a lot of my feelings on the process of repurposing and upcycling items and clothing.  I do not like the "throw away society" that we have become.  I guess some of that comes from my age- after all, "back in MY day" when your TV broke you could take the back off, remove the tubes, go down to the corner grocery to test and replace the faulty parts.  I love taking things that still have some life in them, and bringing them into this decade.


I have become obsessed with vintage images and image transfer.  And I especially love bringing those long-forgotten images forward and creating something natty contemporary.  


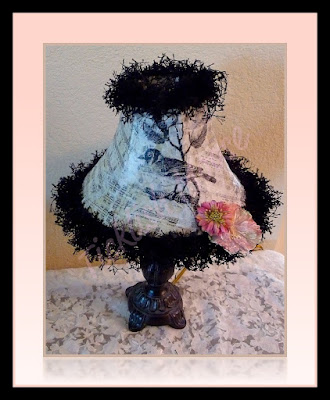
 Here is the latest and greatest "after"


But ya gotta get there, right?  So- let's do this thing!!


Start with one sad old lamp
My lamp is small with a vinyl-covered shade.  This process would work for most any flat surfaced (non-pleated) shade.  I simply downloaded this image from Graphics Fairy 


Karen has 1000's of free images to use- and I go to her site often  :)

I also used this image  (quote) I found on the internet to build on, so to speak:
I also went online and found sheet music for 'bird themed' songs.....you know, like Rockin' Robin, Black Bird, Mockingbird, etc.   Since my lampshade is just 7" high, I used Publisher to combine/print 2 images per 8 1/2" x 11" sheet of paper.  I wanted the light to shine through the images, so I printed them onto tissue paper.


Here is where the word *tutorial* pays off for you- because I get to spare you a bunch of frustration and cursing sobbing.  

  1. get some 1/2" wide 2-sided tape (you may use this already for scrapbooking)
  2. use plain cardstock paper, not textured (8 1/2 x 11)
  3. use cheap old tissue paper- not the kind with a *nice* glossy side
  4. if possible, print your images with a laser printer or use a copy machine.  The toner-based inks do not run when you get them wet with decoupage medium.
DO NOT BELIEVE the other blogs that tell you that you can somehow stick the tissue paper with spray adhesive to the cardstock and run it through and come up with something usable in the end.  THEY LIE!!!!!

Use this simple, Ticklish Moose Tutorial Tip, which makes it so simple you will laugh out loud....ready??  Bwaa-haaa-haaa!!  

 Tutorial Tip:
Simply adjust the size of your image so you have a decent 3/4" to 1" of margin space outside of the actual image you want to use.  Stick the 1/2" wide piece of 2-sided tape across the leading edge (end that feeds into the printer) of the cardstock.  You can use 2 smaller pieces on the  other end just to keep the tissue paper nicely in place as it feeds through the printer.  You can smooth out (or lightly crumple up) the tissue over top of the taped cardstock.  Flip it over and trim off any excess tissue paper.   Put the tissue paper covered cardstock into your printer so you print on the tissue paper side.  Print your image and voila`...... you did it!!  Carefully tear off your printed page.

Repeat as many times with the cardstock as you need images.
I used 6-7 printed sheets for my small shade (I had a few scraps leftover)


Gather up your printed pages, a foam brush and whatever decoupage medium you prefer.  I used PPA for this application.


Thursday, December 2, 2010

Still Time For a Homemade Gift.....

The weather outside is delightful these days.  But, being December it is not destined to last.  We have had a very mild and dry fall.  Most of our trees still have not turned colors.  It seems strange to have green leaves on many trees, and Christmas decorations everywhere.  I grew up in Michigan in the crook of the thumb and when I lived up there the first 20 years of my life winter meant SNOW!  Lots and lots and lots of snow.  Truck it down by the Tittabawassee and maybe by June it would be all gone. 

The extraordinary diversity of Texas includes 10 climatic regions, 14 soil regions, and 11 distinct ecological regions.  Here in North Central Texas we have 4 distinct seasons.  That means lots of clothes for everything from zero to 110 degrees!!  We are blessed with a long *flip flop* season, but we definitely also use warm coats, hats, gloves and boots.  Which brings me to this weeks tutorial.  It is a fast, fun upcycle which has a million possibilities for customization and personalization, and it is totally wearable, too!

Isn't this the cutest headband ever?? 
(Not so sure I'm giving this one away)


Here is my finished project:
Once you see how simple these are to make, and basically free, you will never spend $$ to buy one again!  I am totally working on the matching scarf!

Okay- this looks like a lot of steps, but hang in there.....once you get the pattern made it goes really fast.  
Gather some supplies:
I used an old pair of grey sweatpants that no longer fit anyone, and a scrap of red polar fleece left over from another project.  I am also considering using the wording area from a sweatshirt that no longer fits, and a felted sweater.  I hope to have some of those made to show you before Christmas, but no promises.  If you make one, I would love for you to email me the pics, so I can add it to the blog for others to see  :D
You will need basic sewing skills, basic sewing supplies, some paper to make the pattern (I used legal sized printer paper), and freezer paper for the stencil.    
I started by freehand sketching a basic headband shape on a piece of legal paper:
To make it come out even, fold in 1/2 width-wise, then fold in 1/2 length-wise, and refine the shape when you cut it out.  Use your sketch lines as a guide:
Here is the first part of the pattern cut out:
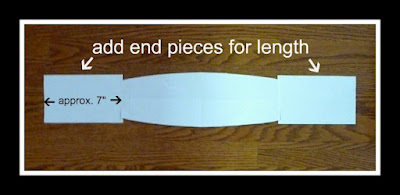
Add some ends to make it long enough:
Trim it to smooth out the shape:
Now you have your pattern!  Cut one of your top fabric (mine is the grey sweats) and one of the lining (mine is red fleece).  Be sure you cut your length with the stretch of the fabric!  I cut out a test pattern from some scraps of plaid fleece just to be sure I liked the size of the band on my head.  I have a pretty *average* sized head, so my pattern size should work for *most* everyone.  If you are the *Big Head* person in your family, (you know who you are) you may want a slightly wider band.  
 Here is the part that took me forever the most time.....picking the graphic!  Lucky you- you can copy my design if you want!
You are welcome to download a copy here:
When I printed it, I used the 'landscape' paper setting, letter size paper, and I 'justified' or stretched it to the length of the paper.
I traced the design loosely onto my freezer paper.  If you want, you can print on the freezer paper.  I wanted to be able to trace it more than once.
 Carefully cut out your design, and iron it onto your fabric, using the 'wool' setting on the iron:
I used VersaCraft ink for fabric in black.  I blotted it on, using my fingers under the fabric to get the edges of the design darker.  You could also use paint for fabric, or add a textile medium to acrylic paints.  Just be sure to heat set after it has dried.  

Monday, September 20, 2010

"Luxury must be comfortable, otherwise it is not luxury." -- Coco Chanel

I have to say- I totally agree with Coco on this.  What good are nice things if they are 'too nice' for the people around you?  I have always worked my designs with this in mind.  I wanted to honor Coco in a recent upcycle, and I thought I would share it with all of you.  


 I have a *thing* for boxes and containers of all kinds!  Some because they help hide my clutter, some hold treasures, others help keep me organized.  So, when I saw this outdated jewelry box, I knew I could give it a new life's purpose!


I was inspired by an image I found online called "Chanel Bicycle".
If you 'google' vintage bicycle images, there are quite a few choices.  Evidently there was a design craze early in the 20th Century for high end designers to do bikes.  There is an awesome Hermes' as well.  If you click on the Graphic's Fairy button on my side bar- Karen has lots and lots of great vintage images she shares as well. 


This upcycle was actually one of the easier ones I have done.  You may have a childhood jewelry box of your own that needs a new life- I found this one @ my local thrift shop.  The glass was easily removed from behind by loosening the screws and set plates.  I used the glass for my template for my new fabric insert.  I simply printed the image on my laser printer (you can also use inkjet) onto a product I like to use called  Lazertran .    Then I ironed it onto the burlap piece I had cut oversized, for the insert.  I adhered the burlap to a stiff piece of cardboard, and cut to fit.


Monday, August 9, 2010

"Every Leaf Speaks Bliss To Me, Fluttering From The Autumn Tree" Emily Bronte


I'm not sure if it is all of the 'back to school' ads, or if it has been the 16 straight days of temperatures over 100 degrees, but right now I am looking forward to fall.  I decided to make this fall leaf garland from some of the old books I have and post it as a tutorial for any other like-minded individuals out there.


Like most of my other projects it is fairly quick, inexpensive to make, and an  easy skill level.  After all, we are busy modern women with a lot to get done in a day :)


You will need just a few materials that you probably have on hand:

an old book
2 or 3 coordinating scrapbook paper or cardstock
light gauge wire (mine was 26 gauge floral wire)
white glue or modge podge
foam brush
sharp scissors
wire cutter
ink pad in a coordinating color
heavy twine
raffia or ribbon
large beads 
I also coated my finished leaves with matte clear acrylic spray


You can use your own, or print out my

I used the leaf patterns I marked 'A' - 'B' - 'C'
For leaf 'B' I printed out the image at 50%.

Once you have decided which leaves you want to use, stack 3 or 4 pages you have torn from your book, and use your template as a cutting guide.  You will need to flip them over and determine which side you like the look of best, given the cuts and the printed words.

Loosely cut the shape from your scrapbook paper.  Clip pieces of wire that will fit in your leaf size.


I used white glue thinned with a small amount of water, but modge podge will also work.  Just spread some with your foam brush on the back of the loosely shaped scrapbook paper piece you have cut.  Add the wire in the appropriate places and stick your book-leaf down smoothing the edges and making sure the paper is pushed tight against the wire pieces.  Don't freak if the wire sticks out a little bit- you can trim it with your wire cutter later.


Should look something like this:


I set my leaves in the sun to dry, which here literally took about 3 minutes.  It worked well to stick a leaf and put it in the sun to dry while I was prepping another.  The wire inside adds a nice stiffness and bendability to these.


For this garland I chose a fall color theme, but I plan to do one just for my Halloween decorations.  Here is a picture of each:


Saturday, May 15, 2010

Plain Dress Dress-Up


In my next few blog entries, I will be taking some rather plain,  everyday kind of clothing items, and adding some inexpensive *bling* to bring them into 2010.   I will go through the supplies and steps below.  This upcycle cost nothing, because the dress was here, and not being worn because of it's "too plain" look, and the fabric flowers were made from cotton t-shirts my son had outgrown.  As fast as he has grown the past few years, we seem to have lots of those!


So, grab your scissors.....here we go!
                                  

  • First- all you need is a shirt, dress, or top lying around that could use a little help.  Most everyone has more than one thing they bought, but just can't get excited about wearing.  There are some items, like this dress, that when I bought it I thought "great, I can accessorize this", and yet, somehow.......accessories just don't work right.  
  • Second- go through your drawers, or your significant others, or even your neighbors drawers and harvest a few lost and forgotten T-shirts.  Pick shirts of similar weight.
  • Third- find some items to trace around to make your circles patterns.  I used measuring cups, and made my patterns from stabilizer backing I use for machine embroidery.  My 3 circles sizes ended up approx.  2 1/2"- 2 1/8" and 1 5/8" diameter.  
  • Fourth- start cutting lots of circles!  I decided on alternating my background colors, so some flowers would be gray (largest), black (medium) and some black (largest), gray (medium), but my centers were always white.  I needed 9 of each combination, so 18 groups of 3 circles. Now that all of the circles are cut comes the fun part- assembling the flowers!!  Just stack 3 circles on top of each other, pinch from the bottom in the center, and sew a few tack stitches, until you get the amount of ruffling and shape you desire.   I love the bling, so I added pearl beads to the center of each of my flowers, just for fun.  You could add buttons, bells, anything that you like- or leave them blank in the middle.  There is certainly no right or wrong to any of this.  You may want to do more or less flowers per garment, depending on what type of garment you are adding the flowers to.  Again, personal taste is your guide.  Here is a picture of my flower groups in process:      


I pinned the flowers on the dress to arrange them (and figure out how many I needed to make), and also so it would be easier to sew them correctly into place.  Then, I just sat down and stitched them by hand to the yoke of the dress. 

All My Best

Telling People What I Think For 40+ Years!!

Blog Advertising - Advertise on blogs with SponsoredReviews.com