Crafty Moose gone wild!

Welcome to the Ticklish Moose blog!

Be sure to visit my webstore for some great freebies, as well as Ticklish Moose merchandise:


http://www.ticklishmoose.com/

Creative License

Creative Commons License
All Shown On This Blog by Ticklish Moose is licensed under a Creative Commons Attribution-NonCommercial-ShareAlike 3.0 Unported License.
Permissions beyond the scope of this license may be available at http://www.ticklishmoose.com.

Search This Blog

Showing posts with label paper. Show all posts

Wednesday, June 13, 2012

Printable Freebies

The past few weeks have gone by fast!  I helped my daughter look for a new apartment, took a few naps, and worked on some sewing and a couple of new printables.  Given the fact that it will be the 4th of July holiday in just a few short weeks, I feel like I should be working on Christmas stuff already!

I wanted to add a little 4th of July flair to my mantle, so while I was (supposed to be) resting my back I put together a little sumthin'-sumthin' to share


Download full size (8 x 10) high resolution pdf here:


My daughter will be sharing her new apartment, which prompted this printable, which will also be a housewarming gift!  I ended up making it in about 10 colors, but settled for putting these 4 colors on the printable:


Download the high resolution 2-page set for 5 x 7 frames here:


And here they are on my mantle in some freshly re-painted frames!


Happy Wednesday!


Friday, June 1, 2012

Cowgirl Pin-Ups

I've had a busy few days, still doing lots of cleaning out and organizing.  Dull, dull things like linen closets, but a necessary thing from time to time.  I've run across a few things I had forgotten about- a lovely matelasse`bedspread and shams and a hand crocheted pillow my mom had made for me.  

They might seem like things you would remember you had, but honestly when we built and moved into this home I was quite ill.  We were downsizing which turned out to be one of the best moves we made, but there were things that got pushed aside that I just couldn't make a decision on at the time.  So when I have good days I keep working at these things.  And try to squeeze in a project or two just for fun.  :D

Got a few good picks this week- this wonderful chrome over copper English Teapot and the fun, folksy vintage tablecloth it is on


and this '70's vintage ceramic owl bank


I updated a jewelry box I had gotten some time back.  I used some scrapbook paper and a vintage cowgirl pin up image to dress it up a bit.


Free for your use:


And a cute vintage playing card
 

Have a great weekend!

Saturday, May 19, 2012

Free Ephemera Friday- Saturday Edition

This week I was supposed to be resting my leg because of the nerve problem, until I can get into a specialist to get some 'nerve mapping' done.  It's hard for me to do anything for too long....sitting, walking, standing, reading....you name it.  So trying to sit still for too long...Ugh!  Too hard!  I decided to try to use some of the time creatively and work with some photo editing software.  I plan to use some Bingo card images in an upcoming project, so I had a little fun and I am sharing it with you!


Download Bingo Card Collage Here 


Here is one idea to get you started


And one more freebie to share:


Paper Doll Download 

Have fun! 

Tuesday, April 3, 2012

Opportunity Can Ring My Bell

I have a confession.  An ugly one.  This was my doorbell.


Please be clear....I have tried and tried to do better.  I just haven't been able to find something that was 'me'.

Some options I have explored:


Or possibly???


NO!!!!

But you can see my dilemma.  

Then you know how sometimes two things can just somehow come together in your mind?  Boom! A tutorial was born!!

Simple, pretty and quick.
And we get to play with electricity!

 
Here is all you will need 

An unfinished wooden switchplate
Mod Podge (I used outdoor)
A lovely paper napkin 
Gesso or primer
180 grit sandpaper
Sponge applicator
Screwdriver and/or cordless drill
I also bought a new dark brown cheapo doorbell,
but you could repaint the one you already have if need be


 Lightly sand and gesso or prime the wooden switchplate


I made sure my screw holes lined up correctly (bonus- they did!) and lightly traced where the doorbell housing would go so I could estimate the amount of space I would have left for the design of the napkin to show.  I picked up these lovely spring napkins at Tuesday Morning for $1.70

Once you figure out what part of the napkin you want to use spread a thin coat of Mod Podge on the switchplate.  You are going to get one shot at sticking down the napkin, so hold your breath and bite your upper lip.  Separate the layers of the napkin and just stick the pretty part on.


Smooth it out and tear or cut off the excess.  Add a layer of Mod Podge to the top.  Let dry a few hours and top coat again.  Now the hard part.....walk away for 72 hrs to let it completely cure.  Use a craft knife to cut paper away from the holes in the backplate.


When the wait is over the fun part starts- playing with live wires!
Remove the screws holding the doorbell.  There should be 2 wires connecting it.  Loosen the little screws on the back that hold the wires and carefully remove each one, being sure they do not come in contact with each other.

 Pull the wires through the middle hole of the switchplate, making sure the ends do not touch each other!  Use a screw or find a third hand to hold the plate on the wall while you pick up your doorbell.


 Reconnect the wires to the (new) doorbell and screw it back onto the wall.
I plan to do a different 'theme' for each season, but for now I am just happy to have this to greet my guests!


Happy Spring!!

Friday, March 30, 2012

Free Ephemera Friday #2

I'm back- and it's hard to believe another week has gone by so quickly!  For whatever reason I have been dropping everything I put my hands on lately.  Yesterday I dumped an entire jar of gesso! *sigh*  I did make a cute spring project to share but there is a 72 hr dry time before I can finish assembly so while we are waiting here are a few more free images for you!


Have a fun weekend and I'll be back in a few days with my spring project share!

Friday, March 23, 2012

Free Ephemera Friday

Okay, I know I have made 'promises' before, but I am starting a new weekly feature called Free Ephemera Friday.  I will be sharing copyright free images I have found during the week for your use in your projects as well.

Here are the first of hopefully many shares:


If you make something cool, let me know and I will show your work on my blog!

Have a great weekend!!

Monday, March 19, 2012

Mannequin Tag Freebie + A Few Other Goodies + A Tutorial!

I've been busy!  Scanning. Sorting. Spring cleaning.  I saw this cute organizer idea in GreenCraft Spring 2012 issue


The tutorial is also blogged by Cynthia here:


Not only was I reorganizing all of my sewing and craft supplies, I just so happen to have some cans, a Lazy Susan, and I opted for using decorative paper instead of fabric but I am very pleased with my results!

 
Thanks Cynthia!!
I have been working really hard on scanning (copyright free) images to use for the collage and mixed media work I am just beginning to get into.  I have been obsessed with image transfer and hope to not only share some work here, but free images as well.  Here are a few to get you started:


And here is a set of mannequin tag freebies you can download, print and cut out to use in your journaling, as a base for collage, price tags, gift tags or anything else you want to use them for other than selling them on your site.  I have a firm belief in sharing on the web  :D   Click on the picture and use "original size" and these should end up fitting an 8 x 10 piece of paper.


Enjoy!!

Saturday, May 14, 2011

Thrifty Tissue Paper Lampshade (a tutorial)


I haven't asked you to make me young again. All I want is to go on getting older.
- Konrad Adenauer


That quote sums up a lot of my feelings on the process of repurposing and upcycling items and clothing.  I do not like the "throw away society" that we have become.  I guess some of that comes from my age- after all, "back in MY day" when your TV broke you could take the back off, remove the tubes, go down to the corner grocery to test and replace the faulty parts.  I love taking things that still have some life in them, and bringing them into this decade.


I have become obsessed with vintage images and image transfer.  And I especially love bringing those long-forgotten images forward and creating something natty contemporary.  


 Here is the latest and greatest "after"


But ya gotta get there, right?  So- let's do this thing!!


Start with one sad old lamp
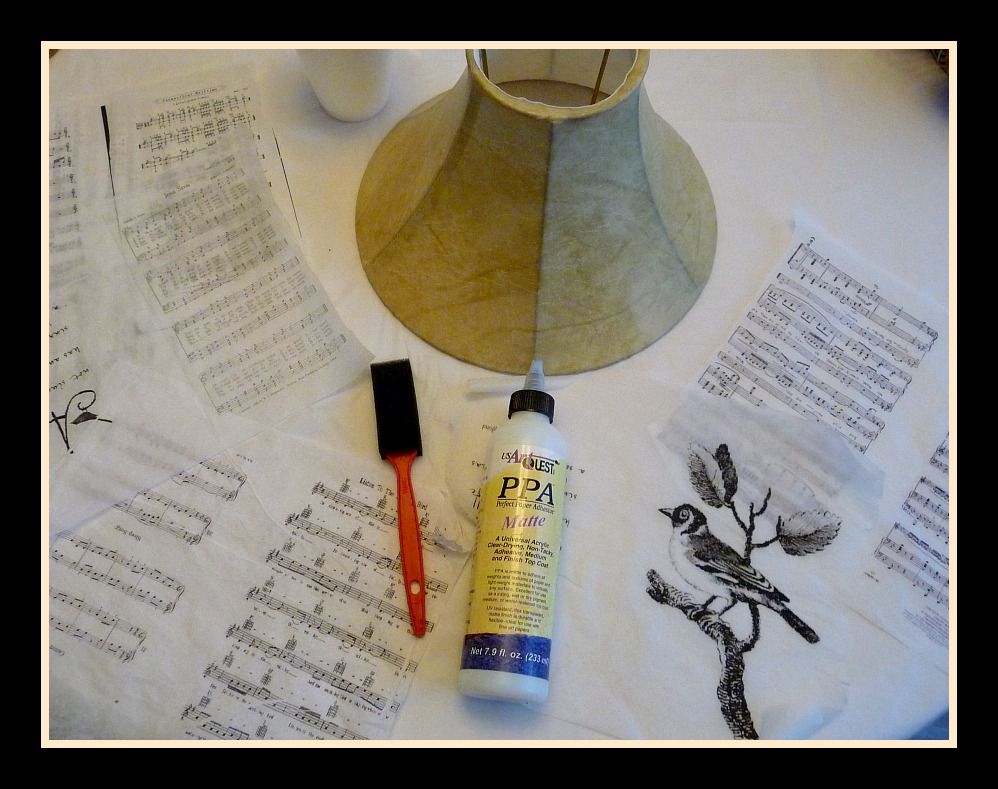
My lamp is small with a vinyl-covered shade.  This process would work for most any flat surfaced (non-pleated) shade.  I simply downloaded this image from Graphics Fairy 


Karen has 1000's of free images to use- and I go to her site often  :)

I also used this image  (quote) I found on the internet to build on, so to speak:
I also went online and found sheet music for 'bird themed' songs.....you know, like Rockin' Robin, Black Bird, Mockingbird, etc.   Since my lampshade is just 7" high, I used Publisher to combine/print 2 images per 8 1/2" x 11" sheet of paper.  I wanted the light to shine through the images, so I printed them onto tissue paper.


Here is where the word *tutorial* pays off for you- because I get to spare you a bunch of frustration and cursing sobbing.  

  1. get some 1/2" wide 2-sided tape (you may use this already for scrapbooking)
  2. use plain cardstock paper, not textured (8 1/2 x 11)
  3. use cheap old tissue paper- not the kind with a *nice* glossy side
  4. if possible, print your images with a laser printer or use a copy machine.  The toner-based inks do not run when you get them wet with decoupage medium.
DO NOT BELIEVE the other blogs that tell you that you can somehow stick the tissue paper with spray adhesive to the cardstock and run it through and come up with something usable in the end.  THEY LIE!!!!!

Use this simple, Ticklish Moose Tutorial Tip, which makes it so simple you will laugh out loud....ready??  Bwaa-haaa-haaa!!  

 Tutorial Tip:
Simply adjust the size of your image so you have a decent 3/4" to 1" of margin space outside of the actual image you want to use.  Stick the 1/2" wide piece of 2-sided tape across the leading edge (end that feeds into the printer) of the cardstock.  You can use 2 smaller pieces on the  other end just to keep the tissue paper nicely in place as it feeds through the printer.  You can smooth out (or lightly crumple up) the tissue over top of the taped cardstock.  Flip it over and trim off any excess tissue paper.   Put the tissue paper covered cardstock into your printer so you print on the tissue paper side.  Print your image and voila`...... you did it!!  Carefully tear off your printed page.

Repeat as many times with the cardstock as you need images.
I used 6-7 printed sheets for my small shade (I had a few scraps leftover)


Gather up your printed pages, a foam brush and whatever decoupage medium you prefer.  I used PPA for this application.


Sunday, December 5, 2010

More *almost* Free Gifts

I like to think that God has a sense of humor.  

Case in point- I have often been referred to as 'The Queen'......don't ask me why  ;-)   Seriously- even as a little girl my parents said I must think I was the Queen.  Hmmmm.  So, it would only be *fitting* that I should get a crown for Christmas, right??  Unfortunately, the crown I am getting is NOT the kind to put on my head!!  That's the irony at play here.....last night I cracked a porcelain crown on a molar.  Yippee  :/

So guess what.  More people on my gift list will be getting something handmade this year.  Not necessarily a bad thing. 

I visited a few craft shows in the last few weeks, and there are lots of ways to spend your hard earned money to buy 'personalized' gifts for the folks you love.  I have admired the collage name prints that have the lettering made from architectural pics that resemble or are letters.  Given my architectural background, that is a given, right??  


You can imagine my excitement when I found a Flickr group with these images to share FOR FREE!!  Ahhh, sometimes the stars align.  The name collage prints I saw for sale (unframed) at the craft shows were running just about $10 per letter, and that was in black and white.  I'm sure with the cost of colored ink, they figured why bother increasing their costs, right? 


Certainly, if you want, you can make these personalized word/name prints in black and white.  I like to add color through artwork, so I chose to print my collage on my color laser printer.  Just to save you some time, effort and ink, I will tell ya I tried this with canvas paper and got a pretty mottled result.  I got a vivid print with white cardstock, lightly textured.

Here is my collage print:


Here is my finished project:


The editing and collage program I use is Picnik The basics are free, but the collage part I used is in the premium features which are under $30/yr.  You may already have an editing program you love.....I was just putting that out there for anyone that doesn't already have one.  


Leo Reynolds  is kind enough to share his fabulous collection of architectural photos with everyone FOR FREE (you can tell I love FREE, right??) as long as you follow his copyright rules, which means no resale, but give as many of these awesome gifts as you choose!  


 Just a footnote:
I had my mat custom cut @ my local hobby store for a cost of $5.  The frame was one of many I have purchased over the course of the year at garage sales, etc.  You may have one laying around that could just use a fresh coat of paint.  But, still this project was far below the $150+ it would have cost to have the people at the craft show do it- and the most time consuming part was looking through all of Leo's great photos and selecting my favorites.
A BIG *thanks* to Leo for all of the fantastic Flickr images!

All My Best

Telling People What I Think For 40+ Years!!

Blog Advertising - Advertise on blogs with SponsoredReviews.com