Crafty Moose gone wild!

Welcome to the Ticklish Moose blog!

Be sure to visit my webstore for some great freebies, as well as Ticklish Moose merchandise:


http://www.ticklishmoose.com/

Creative License

Creative Commons License
All Shown On This Blog by Ticklish Moose is licensed under a Creative Commons Attribution-NonCommercial-ShareAlike 3.0 Unported License.
Permissions beyond the scope of this license may be available at http://www.ticklishmoose.com.

Search This Blog

Showing posts with label decoupage. Show all posts

Tuesday, April 3, 2012

Opportunity Can Ring My Bell

I have a confession.  An ugly one.  This was my doorbell.


Please be clear....I have tried and tried to do better.  I just haven't been able to find something that was 'me'.

Some options I have explored:


Or possibly???


NO!!!!

But you can see my dilemma.  

Then you know how sometimes two things can just somehow come together in your mind?  Boom! A tutorial was born!!

Simple, pretty and quick.
And we get to play with electricity!

 
Here is all you will need 

An unfinished wooden switchplate
Mod Podge (I used outdoor)
A lovely paper napkin 
Gesso or primer
180 grit sandpaper
Sponge applicator
Screwdriver and/or cordless drill
I also bought a new dark brown cheapo doorbell,
but you could repaint the one you already have if need be


 Lightly sand and gesso or prime the wooden switchplate


I made sure my screw holes lined up correctly (bonus- they did!) and lightly traced where the doorbell housing would go so I could estimate the amount of space I would have left for the design of the napkin to show.  I picked up these lovely spring napkins at Tuesday Morning for $1.70

Once you figure out what part of the napkin you want to use spread a thin coat of Mod Podge on the switchplate.  You are going to get one shot at sticking down the napkin, so hold your breath and bite your upper lip.  Separate the layers of the napkin and just stick the pretty part on.


Smooth it out and tear or cut off the excess.  Add a layer of Mod Podge to the top.  Let dry a few hours and top coat again.  Now the hard part.....walk away for 72 hrs to let it completely cure.  Use a craft knife to cut paper away from the holes in the backplate.


When the wait is over the fun part starts- playing with live wires!
Remove the screws holding the doorbell.  There should be 2 wires connecting it.  Loosen the little screws on the back that hold the wires and carefully remove each one, being sure they do not come in contact with each other.

 Pull the wires through the middle hole of the switchplate, making sure the ends do not touch each other!  Use a screw or find a third hand to hold the plate on the wall while you pick up your doorbell.


 Reconnect the wires to the (new) doorbell and screw it back onto the wall.
I plan to do a different 'theme' for each season, but for now I am just happy to have this to greet my guests!


Happy Spring!!

Friday, March 23, 2012

Free Ephemera Friday

Okay, I know I have made 'promises' before, but I am starting a new weekly feature called Free Ephemera Friday.  I will be sharing copyright free images I have found during the week for your use in your projects as well.

Here are the first of hopefully many shares:


If you make something cool, let me know and I will show your work on my blog!

Have a great weekend!!

Saturday, May 14, 2011

Thrifty Tissue Paper Lampshade (a tutorial)


I haven't asked you to make me young again. All I want is to go on getting older.
- Konrad Adenauer


That quote sums up a lot of my feelings on the process of repurposing and upcycling items and clothing.  I do not like the "throw away society" that we have become.  I guess some of that comes from my age- after all, "back in MY day" when your TV broke you could take the back off, remove the tubes, go down to the corner grocery to test and replace the faulty parts.  I love taking things that still have some life in them, and bringing them into this decade.


I have become obsessed with vintage images and image transfer.  And I especially love bringing those long-forgotten images forward and creating something natty contemporary.  


 Here is the latest and greatest "after"


But ya gotta get there, right?  So- let's do this thing!!


Start with one sad old lamp
My lamp is small with a vinyl-covered shade.  This process would work for most any flat surfaced (non-pleated) shade.  I simply downloaded this image from Graphics Fairy 


Karen has 1000's of free images to use- and I go to her site often  :)

I also used this image  (quote) I found on the internet to build on, so to speak:
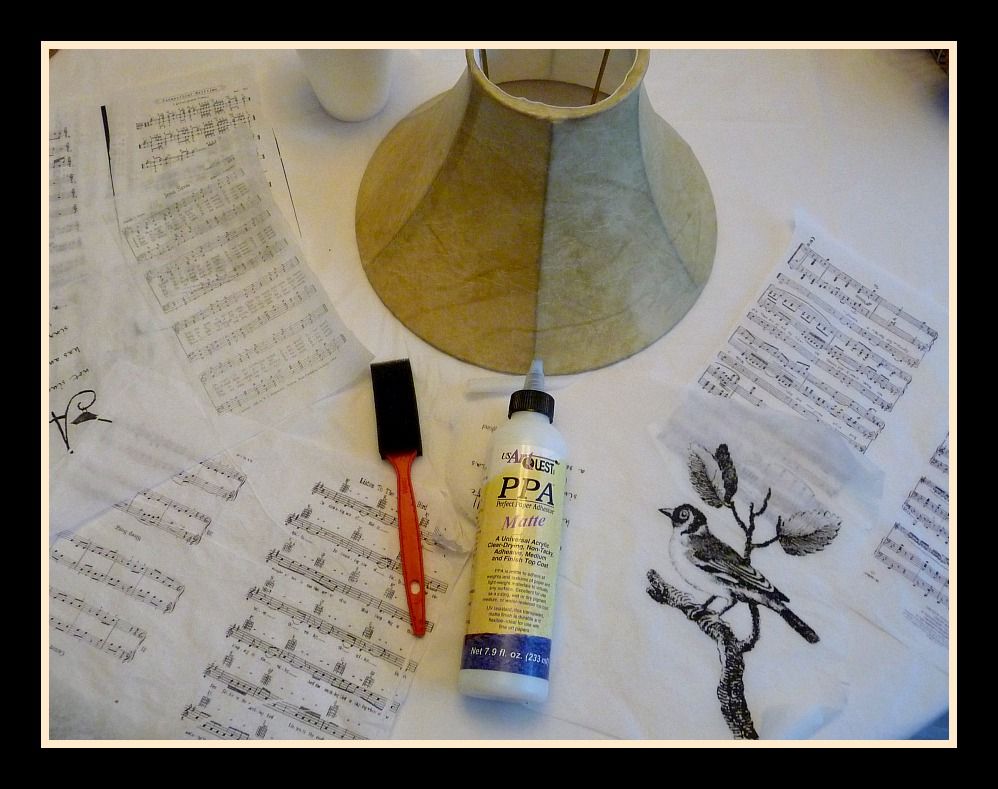
I also went online and found sheet music for 'bird themed' songs.....you know, like Rockin' Robin, Black Bird, Mockingbird, etc.   Since my lampshade is just 7" high, I used Publisher to combine/print 2 images per 8 1/2" x 11" sheet of paper.  I wanted the light to shine through the images, so I printed them onto tissue paper.


Here is where the word *tutorial* pays off for you- because I get to spare you a bunch of frustration and cursing sobbing.  

  1. get some 1/2" wide 2-sided tape (you may use this already for scrapbooking)
  2. use plain cardstock paper, not textured (8 1/2 x 11)
  3. use cheap old tissue paper- not the kind with a *nice* glossy side
  4. if possible, print your images with a laser printer or use a copy machine.  The toner-based inks do not run when you get them wet with decoupage medium.
DO NOT BELIEVE the other blogs that tell you that you can somehow stick the tissue paper with spray adhesive to the cardstock and run it through and come up with something usable in the end.  THEY LIE!!!!!

Use this simple, Ticklish Moose Tutorial Tip, which makes it so simple you will laugh out loud....ready??  Bwaa-haaa-haaa!!  

 Tutorial Tip:
Simply adjust the size of your image so you have a decent 3/4" to 1" of margin space outside of the actual image you want to use.  Stick the 1/2" wide piece of 2-sided tape across the leading edge (end that feeds into the printer) of the cardstock.  You can use 2 smaller pieces on the  other end just to keep the tissue paper nicely in place as it feeds through the printer.  You can smooth out (or lightly crumple up) the tissue over top of the taped cardstock.  Flip it over and trim off any excess tissue paper.   Put the tissue paper covered cardstock into your printer so you print on the tissue paper side.  Print your image and voila`...... you did it!!  Carefully tear off your printed page.

Repeat as many times with the cardstock as you need images.
I used 6-7 printed sheets for my small shade (I had a few scraps leftover)


Gather up your printed pages, a foam brush and whatever decoupage medium you prefer.  I used PPA for this application.


Wednesday, April 6, 2011

Spring Graphics Freebies


This week should have been easy, but has gone South in a hurry.  At least it's hump day!  


Good news!
The *new* (to me!) scanner I picked up at the garage sale has been great and so easy to use!  I never could get our old all-in-one machine to work with my laptop correctly.  I am not an IT genius so if it ain't simple it ain't happening! 

I wanted to share a few of the spring graphics I scanned for you to use if you choose.  I also wanted to share a few pics of some things I have been working on.  I couldn't remember if I had posted this cuff previously on the blog.  It was a cuff from a silk blouse, and I added flowers upcycled from an old lei and various vintage buttons and beads from my (vast) hoarde collection:


This next little project started as a horrible forest green box with runs and smears (sorry whoever's kid made it for them!).  I added a black distressed finish, some decoupage and made some funky pulls out of mini spools and buttons.  I added the chicken wire for fun!  I think it turned out great:


I love toile! 


The next picture group is a set of lavender sachets I whipped up.  The images printed on muslim are saved on a Publisher Document, so I could print 4 to an 8 1/2 x 11 piece of fabric.  I used the same technique as when I printed on the twill tape- you just use a temporary adhesive to stick the muslim to a piece of cardstock, and print directly onto your fabric from your printer.  Just be sure to heat set (from the backside!).


These were made simpler by starting with a 5" Moda Charm Pack:


The white wire basket was one of my garage sale finds from last week!

Saturday, July 24, 2010

A Book, A Duck and A Candlestick....


No- it's not a joke or a strange version of Clue...it's my latest project!  About 8 months ago, I ran across several duck decoys @ the local thrift.  A few were painted by local artists, and a few evidently by someone's grandkids or something.   They were just about $1/each, and I loved the form, but the paint on a few.......well, notsomuch.  This particular decoy I had already primed over in anticipation of something awesome- but what on Earth would it be??  I am not an especially good detail painter.


Inspiration came in 2 ways.  One: a decorating magazine that has some cool, but pricey items, and the other: a tutorial from another blog.   There is an awesome tutorial on the fun blog Living With Lindsay for a book wreath, and she explains it better than I ever could, and I will show you my book wreath accomplishments below.   The decorating magazine had a large dog form that had been covered in decoupaged paper made from playing card images.  I also imagined forms covered with sheet music, but I had leftover book pages from my wreath project, so in the spirit of waste not/want not, torn book pages it would have to be!

My duck started out uglier (sorry kiddos) that this, but so you will not be forced to avert your eyes from my blog, I will only show you the primed image:


I simply used torn book pages and Modge Podge, and covered him/her up!
When I was covering the decoy, I used my poor raggedy fingernails to push the wet paper into the carved places, to keep the detail.  When it was dry, I sprayed it with 2 coats of clear acrylic. 
 
I also had rescued a sad little blue candlestick that was marked .25 at the thrift store as well:


As usual, a can of black spray paint cured the blue candlestick of it's shameful appearance.  Then I simply added strips of ribbon to the top to give it a little 'nest' for objects to sit on.  The ribbon I wanted to use was not wired, but I quick dip in some stiffener made it use-able for this application.


All My Best

Telling People What I Think For 40+ Years!!

Blog Advertising - Advertise on blogs with SponsoredReviews.com