Crafty Moose gone wild!

Welcome to the Ticklish Moose blog!

Be sure to visit my webstore for some great freebies, as well as Ticklish Moose merchandise:


http://www.ticklishmoose.com/

Creative License

Creative Commons License
All Shown On This Blog by Ticklish Moose is licensed under a Creative Commons Attribution-NonCommercial-ShareAlike 3.0 Unported License.
Permissions beyond the scope of this license may be available at http://www.ticklishmoose.com.

Search This Blog

Showing posts with label thrift store finds. Show all posts

Friday, June 1, 2012

Cowgirl Pin-Ups

I've had a busy few days, still doing lots of cleaning out and organizing.  Dull, dull things like linen closets, but a necessary thing from time to time.  I've run across a few things I had forgotten about- a lovely matelasse`bedspread and shams and a hand crocheted pillow my mom had made for me.  

They might seem like things you would remember you had, but honestly when we built and moved into this home I was quite ill.  We were downsizing which turned out to be one of the best moves we made, but there were things that got pushed aside that I just couldn't make a decision on at the time.  So when I have good days I keep working at these things.  And try to squeeze in a project or two just for fun.  :D

Got a few good picks this week- this wonderful chrome over copper English Teapot and the fun, folksy vintage tablecloth it is on


and this '70's vintage ceramic owl bank


I updated a jewelry box I had gotten some time back.  I used some scrapbook paper and a vintage cowgirl pin up image to dress it up a bit.


Free for your use:


And a cute vintage playing card
 

Have a great weekend!

Tuesday, May 15, 2012

That Old Thing?

My 3 favorite little words right after "just take it".  
Those words began my chair project


The finish was shot and the seat was just formed rubbery plastic, not even a real rush seat!  But I knew immediately what I needed to do.  I washed off the bird poop and the old dried bubble gum.  I gave it a light sanding to remove the loose debris.  I got out a jar of my Country Living Caromal Colours Paint in 'paprika' and got to work under the shade of my big oak tree.

If you have never used these awesome finish products you just have to give them a try!  They bond without stripping, have a great vintage feel and you can layer the products to create all different kind of looks.  I gave this chair one good coat of paint, and then sanded away some for a vintage, worn effect.


I added a fun quote by tracing it on the chair with carbon paper and then going over it with a permanent paint marker, then lightly sanding again.


Since it was going to be out in the sun and the rain I used an outdoor poly coat to seal the whole chair.  I had part of a roll of chicken wire out in the shed that I cut up and formed into my 'basket' to hold the dirt and flowers.  This was probably the most tedious part, but I totally love chicken wire, so for me it was worth every minute!   I bought 2 coco-fiber window box liners at Big Lots for $4 each to form my liner to fit the odd shape .  Perfect!  


Added a few plants and voila`


Now enjoying a new life on my front porch!
I am so excited to see how much better it will look as the summer goes on and the plants mature  :D

The old shall be new
On this you can depend


Tuesday, May 1, 2012

Just a Quickie Re-do

Just when I think I can stay focused a project drags me into it's lair.  I'm not sure where I first saw this brainiac idea for a portable, folding, pretty-much-perfect-height ironing board upcycle but I thought I would do a quick share.  

What is great about this ironing board is you can add some quick table-top area close to where you are working!

First you need an old but sturdy folding TV table.  I have a few around- at the last neighborhood garage sale I picked up a set of 4 for $2.  I had this in mind, but will also more than likely also top one with a flannel-backed vinyl tablecloth for small messy projects.


Next you will need some padding.  You can buy the fancy ironing board cover fabric if you wish, but it is a little pricey and not necessary.  I had some scraps of polyester batting left from an old upholstery project, some smooth white cotton sheeting and I purchased a small/craft size piece of Warm & Natural batting for about $2.50. 

 
 Of course you can use whatever fabric you wish- if you want to co-ordinate with your sewing room etc.  Just be sure that it is not heavily textured because that would transfer to whatever you iron on top of it.

You will also need a few basic tools:
staple gun and 1/2" staples
hammer (for staples that don't lie flat)
pliers (to pull out staples that mis-fire)
scissors to cut fabric
iron to smooth fabric
 optional- drill w/ 1/2" Forstner bit
 
 
 I drilled 4 holes in the tray top to help dissipate the steam, but this is not necessary.  I just like using my drill  :D

 Clean off the tray top and iron your batting and fabrics flat.  I tacked down the poly batting first to help prevent slipping, and then flipped the tray upside down on my layer of Warm & Natural topped with my sheeting.

Now just staple down your layers to the backside like you do for any upholstery project, anchoring each side with a staple before smoothing and finishing each side, then corners.


 Just be sure you staple close enough to the outer edge as to not impede the action of the folding legs.  Trim off the excess fabric and batting.


That's It!!

You now have an easy to store, inexpensive, portable ironing board


Happy Crafting!!

Monday, February 13, 2012

You Know You're a Junker When...

You buy this at a flea market while on vacation, have to bring it back in your carry on and having to explain it to the TSA seems like "no big deal" to you:


Totally worth it, IMHO.  I know a few of you are nodding in agreement!

I also wanted to let everyone know I have cornered the market on tassels.  No nasty comments.... I have big plans.  Big plans I tell you!


I would love to hear any and all ideas besides bookmarks that you come up with to use these.  These particular tassels are the small-ish (about 4") size.  I saw a few ideas I would like to share.

 I could simply display them
have a tassel dinner party


the obvious
 

never know when you might need a footstool!
 

or use them to make even bigger and better tassels??


I'll keep you posted ;-)

Monday, January 30, 2012

Newfangled New Year

I'm back.  Mostly.  I have the majority of my programs loaded and working well on my (fantastic!) new laptop.  I can find all of my files (bonus points).  There is a cool feature on Windows 7 I found where if you right-click on a program that was designed for an older system, it allows you to run it with a previous version of Windows.  Yep.  I am a computer genius (patting myself on the back)

I seem to start the year with reorganizing.  I volunteer at a local Thrift Shop and have gotten my fair share of deals.  I concentrate on wool, silk, leather and suede garments and I never have a problem coming up with a few prime pieces.  I have found that if I deconstruct the garments and wash them prior to storage it takes less room to store the items, and they are ready to go when the mood strikes.

I plan to spend more time this year on mixed media work.  I am obsessed with image transfer and seem to be leaning toward tags and small book making.  I was blessed to get a Darice spiral bookbinding machine for Christmas that I haven't had a chance to play with, as well as a small kiln for glass fusion and Precious Metal ClayI have 220 running out to the shop building, but I need a dedicated outlet and area set up for the kiln.  As busy as my husband is at work right now, I'm guessing May or June before that will get accomplished.

Not to worry.  I have plenty to keep me busy until then.  :)  This Mid-Century bookcase is one of the teak pieces I got at auction last year and had every intention of selling until I just fell in love with it.  


I removed the glass and cleaned and oiled the whole thing and put the glass doors back.  I decided that it looked good in my entry with my crafting/art books inside.  I am still adding books and organizing but I am happy I decided to just keep it.  

Good news is that I am back on track, have my scanner working with this new laptop, and I will be scanning in dozens of dressmakers pattern sleeves from the 40's, 50's and 60's that I recently picked up.  I plan to use them in mixed media collage, but will make the files available for everyone to use as they want!

Wednesday, December 14, 2011

Vintage Rocking Horse Redo


vintage rocking horse, originally uploaded by ticklish_moose.
Latest upcycle- this vintage rocking horse was found in pieces in a barn set for demolition. Since I found all of the pieces the owner let me have her!

My husband put it back together for me, and I refinished it using Annie Sloan chalk paints and chipping creme. It was my first experience using the chalk paint and I have to say I'm sold!! Currently for sale in my space @ The Antique Gallery.

Thursday, December 1, 2011

Trash to Treasure!


Trash to Treasure!, originally uploaded by ticklish_moose.
Seems I can't get enough of upcycling chairs!

Like a lot of things over 50 yrs old, this pair of Danish Modern chairs had some creaky joints and were a little rough on the surface. We gave them a complete overhaul (original finish was not salvageable) and instead of being headed for the landfill, they are now headed for my space @ The Antique Gallery of Lewisville!

Sunday, October 23, 2011

Bad Blogger is Back With a New 'Old' Lamp Project!

What can I say?  It's been a busy past few months!!  My son returned to High School and so we had to get back into the 'school routine', my Rheumatologist had me try a new medication which did not agree with me at all.  As a matter of fact, lets just say short of my anaphylactic reaction to a few other medications I have had in the past, it ranked right up there on the 'bad experience' scale.

I also got a new great-niece!  After 40 hours of labor (yes- you read that right!)  beautiful (and not just because she is 'ours') baby Arwen was born!


Then I went on an 'antiquing' trip to MI, got some fabulous things, got sick from being stuck in that sardine can they call flying coach, and just barely had time to whip up a fall project!   I tend to decorate for fall, not Halloween.  I don't have any small children and the fall theme takes me through Thanksgiving.


Lately it seems, I have had a 'thing' for lamps.  I don't know why.  Possibly because they are plentiful and inexpensive.  One thing for sure- I will never pay full price for a lamp or shade again!

So here is my 'latest' new 'old' lamp project:


But- as usual- we gotta get there, right?  

I recently bought the barley-twist lamp in the photo at our neighborhood garage sale for $3.  I switched out the shade for a narrower one I had on hand from a different lamp I was not currently using so I could group the lamps together.  I think it makes for a kinda neat display  :)

The 'project' lamp is an old, sad 8" tall (minus the shade) glass lamp I got at the local thrift for $4.49.  You know the kind- popular in the 1980's.  Depending on your age, you may already have one around the house  ;-)
Be sure to look at the bottom to see that it is easily taken apart by undoing the wing-nut that holds the threaded rod that goes up the middle.  Just undo it, loosen the cord up through the lamp and you are ready for spray paint.


 I used black satin spray paint and put a little blue tape around the cord to keep the paint off.  Paint the base, and the brass-colored threaded rod that goes in the center.  Of course, you can use whatever color suits you and your project.  Clean the glass and get ready to fill it up!  You could use pine cones, acorns, candy corn.....I chose these cute mini pumpkins and threw in a few small pine cones from my stash.

Monday, August 1, 2011

Finally- Folding Chair Re-Do is Re-Done!


The heat must be getting to me.  


Not that I don't feel justified- after all.....today's temps hovering at 107 degrees sets a new *high* temperature for today's date, and ties us for 2nd place in number of consecutive days over 100 (now at 31) with no end in sight.  With August being our hottest month, we will give many old records a run for the money.  


Somehow these awful wooden folding chairs called out to me while I was at my local thrift.   In a moment of weakness I purchased them and brought them home, with a revitalization plan in mind, of course.  And for the record- I don't even need folding chairs....


I seem to have a weakness for rooting for the underdog.


  These chairs fought me every step of the way!  From the filth and split wood to the *mysterious disappearance* of the black and white toile fabric I had to use for the seats it was one thing after another.  But here it is- VICTORY!!  


This is a Lazertran decal I made and applied to the back of the painted chairs (image from Graphics Fairy)


Oh well, all's well that ends well, right?  These are now for sale in my booth at Antique Gallery of Lewisville  :D

Wednesday, July 13, 2011

Odds and Ends


In all my years of thrifty finds- this is one of my all time favorites!
It is 40" x 40" square and still has the World Market tag on the back!  I think it is going to look great in my daughter's new apartment.  


I am having a melancholy day.  My little doggie is at the hospital getting oral surgery and my nephew may or may not be in the people hospital after a nasty car accident on the freeway.  My oldest sister does not seem to have the ability to use any modern methods of communication including but not limited to the phone, texting, email or smoke signal.  So I am sending out a little prayer for you Tim and hope you are doing OK.

I am working on a super-secret project that I will do a tutorial on after the recipient has gotten it and it's not a secret any more  :)   This is a cabin-fever time of year for me because the heat and intense UV rays keep me from being outside too much.  You would think I would get a lot done, but I spend time obsessing on things......Like this chair:
I bought this chair and ottoman 13 years ago at a great price to fill a big corner of the library of our old house.  It is really large, not super-comfy but not bad either.  I just keep thinking it could be more "me".  But look at all of those furniture tacks!  I just don't think I have it in me to completely rip into this, plus the leather is in perfect shape, as the chair has not had any heavy use.  I have been toying with the idea of just re-doing the bottom cushion, the arm pads and the loose back pillow.  I would like to do a foam core with a down wrapped seat so that it had more of the feel my Uncle Charlie's antiques had.  So it would envelop the person sitting in it more.


I am also considering making my own fabric design for the back pillow, and toying with a few ideas:


So now you know my intentions.  We'll see what happens in the end.  ;-)

Tuesday, June 21, 2011

Ribbon Storage Idea- A 1 Hour Craft

Do you ever spend way too much time looking for something to fulfill a storage or space requirement and then think "duh.....I can just MAKE that!" ?

I have had this idea for vertical ribbon storage for some time now.  I kept thinking about possibly modifying a paper towel holder but the bases are typically too large.  Then the other day I was clearing out some stuff from a shelf in the shed and realized I had everything I already needed!  Booyah!

This is what it looks like completed


This is the pile of junk supplies that started the process


I also used some wood glue, a little 220 grit sandpaper, black spray paint, and ended up using a wooden spool on the top.  My husband was nice enough to put together a cute little power tool kit just for me..........guess he got tired of the endless 'honey-do's' and looking for his tools  :)   So I got to use my awesome new cordless drill on this project!  
The 2 inch diameter wooden disc is a cedar block that had lost it's scent.  Any size piece of wood would work as long as it is larger than the wheel.  The hole in the wheel was not quite large enough to push the dowel into, so I used my handy drill to make the hole the correct size, added a little glue to the bottom edge of the dowel and stuck them together.


Then I just glued the disc to the top of the candlestick, and the wheel with dowel attached to the disc.  I let the whole thing dry about an hour.

Saturday, May 14, 2011

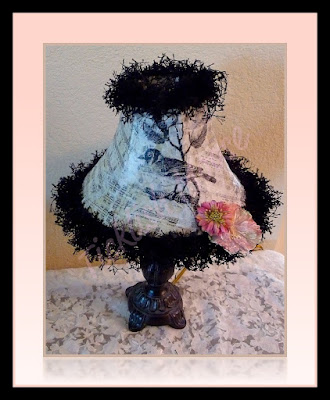
Thrifty Tissue Paper Lampshade (a tutorial)


I haven't asked you to make me young again. All I want is to go on getting older.
- Konrad Adenauer


That quote sums up a lot of my feelings on the process of repurposing and upcycling items and clothing.  I do not like the "throw away society" that we have become.  I guess some of that comes from my age- after all, "back in MY day" when your TV broke you could take the back off, remove the tubes, go down to the corner grocery to test and replace the faulty parts.  I love taking things that still have some life in them, and bringing them into this decade.


I have become obsessed with vintage images and image transfer.  And I especially love bringing those long-forgotten images forward and creating something natty contemporary.  


 Here is the latest and greatest "after"


But ya gotta get there, right?  So- let's do this thing!!


Start with one sad old lamp
My lamp is small with a vinyl-covered shade.  This process would work for most any flat surfaced (non-pleated) shade.  I simply downloaded this image from Graphics Fairy 


Karen has 1000's of free images to use- and I go to her site often  :)

I also used this image  (quote) I found on the internet to build on, so to speak:
I also went online and found sheet music for 'bird themed' songs.....you know, like Rockin' Robin, Black Bird, Mockingbird, etc.   Since my lampshade is just 7" high, I used Publisher to combine/print 2 images per 8 1/2" x 11" sheet of paper.  I wanted the light to shine through the images, so I printed them onto tissue paper.


Here is where the word *tutorial* pays off for you- because I get to spare you a bunch of frustration and cursing sobbing.  

  1. get some 1/2" wide 2-sided tape (you may use this already for scrapbooking)
  2. use plain cardstock paper, not textured (8 1/2 x 11)
  3. use cheap old tissue paper- not the kind with a *nice* glossy side
  4. if possible, print your images with a laser printer or use a copy machine.  The toner-based inks do not run when you get them wet with decoupage medium.
DO NOT BELIEVE the other blogs that tell you that you can somehow stick the tissue paper with spray adhesive to the cardstock and run it through and come up with something usable in the end.  THEY LIE!!!!!

Use this simple, Ticklish Moose Tutorial Tip, which makes it so simple you will laugh out loud....ready??  Bwaa-haaa-haaa!!  

 Tutorial Tip:
Simply adjust the size of your image so you have a decent 3/4" to 1" of margin space outside of the actual image you want to use.  Stick the 1/2" wide piece of 2-sided tape across the leading edge (end that feeds into the printer) of the cardstock.  You can use 2 smaller pieces on the  other end just to keep the tissue paper nicely in place as it feeds through the printer.  You can smooth out (or lightly crumple up) the tissue over top of the taped cardstock.  Flip it over and trim off any excess tissue paper.   Put the tissue paper covered cardstock into your printer so you print on the tissue paper side.  Print your image and voila`...... you did it!!  Carefully tear off your printed page.

Repeat as many times with the cardstock as you need images.
I used 6-7 printed sheets for my small shade (I had a few scraps leftover)


Gather up your printed pages, a foam brush and whatever decoupage medium you prefer.  I used PPA for this application.


All My Best

Telling People What I Think For 40+ Years!!

Blog Advertising - Advertise on blogs with SponsoredReviews.com