Crafty Moose gone wild!

Welcome to the Ticklish Moose blog!

Be sure to visit my webstore for some great freebies, as well as Ticklish Moose merchandise:


http://www.ticklishmoose.com/

Creative License

Creative Commons License
All Shown On This Blog by Ticklish Moose is licensed under a Creative Commons Attribution-NonCommercial-ShareAlike 3.0 Unported License.
Permissions beyond the scope of this license may be available at http://www.ticklishmoose.com.

Search This Blog

Showing posts with label different. Show all posts

Tuesday, November 8, 2011

Grammatically Different Plates- Fresh Ideas Tutorial

Imagination is everything. It is the preview of life's coming attractions.
Albert Einstein

'Live-Laugh-Love'
'I Hope You Dance'
'Believe'
OMG! I am LOL because it has all just gotten so ridiculous, IMHO....

Is that what life has become- someone else's catch phrase?  Does it really reflect your thoughts and wishes for the day?  I am thinking "we can do better than this".  


By now you know I love quotes and Bible verses.  I find great inspiration and comfort in many of them.  I think words hold great meaning.  You probably know someone that has a favorite verse as well.  So wouldn't it be great to give someone (or yourself!) the gift of a word phrase that actually has some deeper meaning?  I'm going to show you how with just an inkjet printer and a few inexpensive supplies.

For this project you will need:
  • A few ceramic plates (or tiles)
I pick them up all over.  You may have a few lying around, but each of these were purchased for anywhere from .49-$2.00 ea.
  • Denatured Alcohol* (find it @ the hardware store)

*flammable- please use in well ventilated area away from flame
  
(click on above link to see where to buy)

 Lazertran has a TON of applications, but for this project we are applying it to a ceramic surface.  I used black type, but you can print colored images if you choose. Don't worry- We'll have more fun with it another day.

  •  Spray Polyurethane* (gloss or satin/matte)
* note: MUST be a urethane- acrylics will not dissolve film! 


  • a few cotton balls
  • a pan of water about 1" deep large enough to hold transfer
  • inkjet printer
There are basic instructions that come with the Lazertran, but believe me- it is nothing compared to the voice of experience here.  A few things to consider:

Choose a plate with a specific rim/edge detail to ease the transition from the Lazertran to the edge.  You can see a faint line of the transfer on some types of plates more than others, especially with a curved inner edge.

 Try to make your image a large enough size to come close to the transition line.  It just looks neater.

I thought the gloss urethane gave a better result on my ceramic plates, but consider the original sheen of your item to give it a authentic look.

If you need to sand out any imperfections in your urethane finish- be sure it is fully cured and use a scotchbrite style sanding pad (fine grit) and lightly sand the surface without putting any real pressure on the pad.  Then apply a light final coat. You may also need a sharp pin/needle to prick air bubbles in the transfer.  

Measure your plate ahead of time to determine the size of your phrase.  I like to use Publisher because it has a handy ruler on the side of the page, but use whichever program you are familiar with.  You do not need to "mirror" or flip your image!  Also, I do at least one 'test' sheet on regular paper to be sure I have things the correct size before I print on the Lazertran sheet.  I would much rather waste a cheap piece of copy paper getting things right.

When you have things the way you want it- print on the white side of the Lazertran.  I'm cheap, so I try to get 2 or more projects per sheet.  Allow it to fully dry- 30 mins or so.  If you are impatient you can try a heat gun, but no promises- OK?


I like to find a circle 'template' to use to get the size/centering correct.  You may have a circle cutter.  I do.....somewhere!  If your plate is square, measure twice, cut once ;-)


Use a pencil to mark your cutting line- then cut just inside the line.


Gather your materials on a covered surface


It's good to check the back of the plate so if there is a logo you get it orientated correctly with what will be your finished product.


Thursday, December 2, 2010

Still Time For a Homemade Gift.....

The weather outside is delightful these days.  But, being December it is not destined to last.  We have had a very mild and dry fall.  Most of our trees still have not turned colors.  It seems strange to have green leaves on many trees, and Christmas decorations everywhere.  I grew up in Michigan in the crook of the thumb and when I lived up there the first 20 years of my life winter meant SNOW!  Lots and lots and lots of snow.  Truck it down by the Tittabawassee and maybe by June it would be all gone. 

The extraordinary diversity of Texas includes 10 climatic regions, 14 soil regions, and 11 distinct ecological regions.  Here in North Central Texas we have 4 distinct seasons.  That means lots of clothes for everything from zero to 110 degrees!!  We are blessed with a long *flip flop* season, but we definitely also use warm coats, hats, gloves and boots.  Which brings me to this weeks tutorial.  It is a fast, fun upcycle which has a million possibilities for customization and personalization, and it is totally wearable, too!

Isn't this the cutest headband ever?? 
(Not so sure I'm giving this one away)


Here is my finished project:
Once you see how simple these are to make, and basically free, you will never spend $$ to buy one again!  I am totally working on the matching scarf!

Okay- this looks like a lot of steps, but hang in there.....once you get the pattern made it goes really fast.  
Gather some supplies:
I used an old pair of grey sweatpants that no longer fit anyone, and a scrap of red polar fleece left over from another project.  I am also considering using the wording area from a sweatshirt that no longer fits, and a felted sweater.  I hope to have some of those made to show you before Christmas, but no promises.  If you make one, I would love for you to email me the pics, so I can add it to the blog for others to see  :D
You will need basic sewing skills, basic sewing supplies, some paper to make the pattern (I used legal sized printer paper), and freezer paper for the stencil.    
I started by freehand sketching a basic headband shape on a piece of legal paper:
To make it come out even, fold in 1/2 width-wise, then fold in 1/2 length-wise, and refine the shape when you cut it out.  Use your sketch lines as a guide:
Here is the first part of the pattern cut out:
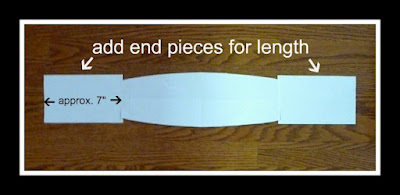
Add some ends to make it long enough:
Trim it to smooth out the shape:
Now you have your pattern!  Cut one of your top fabric (mine is the grey sweats) and one of the lining (mine is red fleece).  Be sure you cut your length with the stretch of the fabric!  I cut out a test pattern from some scraps of plaid fleece just to be sure I liked the size of the band on my head.  I have a pretty *average* sized head, so my pattern size should work for *most* everyone.  If you are the *Big Head* person in your family, (you know who you are) you may want a slightly wider band.  
 Here is the part that took me forever the most time.....picking the graphic!  Lucky you- you can copy my design if you want!
You are welcome to download a copy here:
When I printed it, I used the 'landscape' paper setting, letter size paper, and I 'justified' or stretched it to the length of the paper.
I traced the design loosely onto my freezer paper.  If you want, you can print on the freezer paper.  I wanted to be able to trace it more than once.
 Carefully cut out your design, and iron it onto your fabric, using the 'wool' setting on the iron:
I used VersaCraft ink for fabric in black.  I blotted it on, using my fingers under the fabric to get the edges of the design darker.  You could also use paint for fabric, or add a textile medium to acrylic paints.  Just be sure to heat set after it has dried.  

Sunday, August 8, 2010

God Loves Handmade!

Some days you just get a revelation, or as Oprah would say, "your ahh-ha moment".  I've had one that I would like to share with you. 

First let me say, I am not here to debate God's existence with anyone, talk about any particular religion, or sway anyone's beliefs.  I feel like we all have a personal spiritual journey, and I am just talking about mine.  I do welcome comments on your "ahh-ha moment"- in sharing we grow.

I was standing out on the beach of La Push on the Olympic Peninsula in Washington state.  Let me tell you, I have been on probably 50 different beaches in my life, but never on one so raw and wild.  The pounding of the surf is deafening.  The beauty is overwhelming.  Here is a glimpse:
(click on pics for close up)


Everything there is HUGE!  And that is saying a lot from someone that lives in Texas!!  We do *Big* here quite well, but *Huge* is not something I had encountered in any other place.  Look at the size of the 'driftwood' on the beach!  Really now.....


So- I was walking along, taking it all in.  Looking for shells, rocks, sea glass, treasure....just marveling each thing.  How each and every rock, tree branch, shell, person, cloud...you name it....is all different.  Even twins do not have the same fingerprints.  Then came the revelation: God loves handmade!!


He loves the imperfections, and sees beauty in it.  He could have easily copped out and carbon-copied or cloned things, but instead he chose to make each one different in some way.  A lot more work, but like what I do as well, a labor of love.  And that is when I realized that is how I am a child of God!

I have for years, looked at the Omni-presence of my God in awe.  How could I be a child of God, when we are not the same?  He is great, I am small.  He is all-powerful, I am always asking for help.  But in our creativity, we share a love, we have a bond.  


Take a look at this tree:


I can honestly say I have never seen a tree anything like that!  It was more like a cactus that had gone crazy!!  If you know what it is, please leave a comment....my sister and I are still wondering.


On our visit to the Olympic Peninsula we had the pleasure of staying in Sequim (pronounced *skwim* by locals) in a darling little cottage, in an area of town called 'Happy Valley'.  And it was  :)


This was the inside:


There are many lavender farms in the area, and the following weekend of our stay was the annual lavender festival.  It was so clean and fresh there, the air smelled like lavender and lemon verbena.  It energized me, and intoxicated me all at the same time.

Here are pics from the Port Williams Lavender Farm:


The man that owns the lavender farm was so nice, even though we had shown up right at closing time.  He was kind enough to tell us about all the different types of lavender, their uses, and I bought some lavender honey made from the happy bees they have there on the farm.  

I have a craft tutorial that came from the inspiration of this trip, which I hope to get up tomorrow or Tuesday.  

I will leave you today with a picture of one of the sunsets we saw, which when you think about it, are different each and every day as well.  The differences are what make it (and us) great, and as we embrace the differences in small things like a sunset, and ooh and ahh over it, I hope we can remember to do the same with our friends, our family, and our fellow man as well.  


All My Best

Telling People What I Think For 40+ Years!!

Blog Advertising - Advertise on blogs with SponsoredReviews.com