Crafty Moose gone wild!

Welcome to the Ticklish Moose blog!

Be sure to visit my webstore for some great freebies, as well as Ticklish Moose merchandise:


http://www.ticklishmoose.com/

Creative License

Creative Commons License
All Shown On This Blog by Ticklish Moose is licensed under a Creative Commons Attribution-NonCommercial-ShareAlike 3.0 Unported License.
Permissions beyond the scope of this license may be available at http://www.ticklishmoose.com.

Search This Blog

Showing posts with label cheap. Show all posts

Wednesday, August 1, 2012

Summer Sandals- As Seen on AllFreeHolidayCrafts.com


 I think quite a few of you have seen these 'home-made' summer sandals or some variation there-of, although most I have seen were flip-flop styled.  I am reposting a GENIUS idea from a blog called annekata. These are so wonderful for all of the ladies (and kids!) out there that just can't stand the thingy-between-the-toe!

I found them on a site called AllFreeHolidayCrafts.com


Enjoy!

Tuesday, May 15, 2012

That Old Thing?

My 3 favorite little words right after "just take it".  
Those words began my chair project


The finish was shot and the seat was just formed rubbery plastic, not even a real rush seat!  But I knew immediately what I needed to do.  I washed off the bird poop and the old dried bubble gum.  I gave it a light sanding to remove the loose debris.  I got out a jar of my Country Living Caromal Colours Paint in 'paprika' and got to work under the shade of my big oak tree.

If you have never used these awesome finish products you just have to give them a try!  They bond without stripping, have a great vintage feel and you can layer the products to create all different kind of looks.  I gave this chair one good coat of paint, and then sanded away some for a vintage, worn effect.


I added a fun quote by tracing it on the chair with carbon paper and then going over it with a permanent paint marker, then lightly sanding again.


Since it was going to be out in the sun and the rain I used an outdoor poly coat to seal the whole chair.  I had part of a roll of chicken wire out in the shed that I cut up and formed into my 'basket' to hold the dirt and flowers.  This was probably the most tedious part, but I totally love chicken wire, so for me it was worth every minute!   I bought 2 coco-fiber window box liners at Big Lots for $4 each to form my liner to fit the odd shape .  Perfect!  


Added a few plants and voila`


Now enjoying a new life on my front porch!
I am so excited to see how much better it will look as the summer goes on and the plants mature  :D

The old shall be new
On this you can depend


Tuesday, May 1, 2012

Just a Quickie Re-do

Just when I think I can stay focused a project drags me into it's lair.  I'm not sure where I first saw this brainiac idea for a portable, folding, pretty-much-perfect-height ironing board upcycle but I thought I would do a quick share.  

What is great about this ironing board is you can add some quick table-top area close to where you are working!

First you need an old but sturdy folding TV table.  I have a few around- at the last neighborhood garage sale I picked up a set of 4 for $2.  I had this in mind, but will also more than likely also top one with a flannel-backed vinyl tablecloth for small messy projects.


Next you will need some padding.  You can buy the fancy ironing board cover fabric if you wish, but it is a little pricey and not necessary.  I had some scraps of polyester batting left from an old upholstery project, some smooth white cotton sheeting and I purchased a small/craft size piece of Warm & Natural batting for about $2.50. 

 
 Of course you can use whatever fabric you wish- if you want to co-ordinate with your sewing room etc.  Just be sure that it is not heavily textured because that would transfer to whatever you iron on top of it.

You will also need a few basic tools:
staple gun and 1/2" staples
hammer (for staples that don't lie flat)
pliers (to pull out staples that mis-fire)
scissors to cut fabric
iron to smooth fabric
 optional- drill w/ 1/2" Forstner bit
 
 
 I drilled 4 holes in the tray top to help dissipate the steam, but this is not necessary.  I just like using my drill  :D

 Clean off the tray top and iron your batting and fabrics flat.  I tacked down the poly batting first to help prevent slipping, and then flipped the tray upside down on my layer of Warm & Natural topped with my sheeting.

Now just staple down your layers to the backside like you do for any upholstery project, anchoring each side with a staple before smoothing and finishing each side, then corners.


 Just be sure you staple close enough to the outer edge as to not impede the action of the folding legs.  Trim off the excess fabric and batting.


That's It!!

You now have an easy to store, inexpensive, portable ironing board


Happy Crafting!!

Wednesday, December 21, 2011

Thrifty Tiny Trees

Just taking a little break from the holiday madness to show you a little tree display I whipped up a week or so back.  I saw these expensive mini potted trees in a catalog that shall remain nameless (hint- rhymes with bundt cake).


You are reading it right- just under $100.  I wonder if they will throw in some free shipping??  


I spotted a group of mini trees at Hobby Lobby this season for 50% off of $3 each.  Now you're talkin'.....

I used a few cans I had cleaned and saved- a soup can, a large size bean can, and an International Coffee can.  I covered them with black and white damask wrapping paper and finished them off with some ribbon I liked.  I did have red velvet ribbon and the crystal buckles but for my vignette I decided on something a little different.  

It took less than an hour and total cost was conservatively less than $10.


I think they turned out cute!  

Merry Christmas!

Thursday, December 1, 2011

Trash to Treasure!


Trash to Treasure!, originally uploaded by ticklish_moose.
Seems I can't get enough of upcycling chairs!

Like a lot of things over 50 yrs old, this pair of Danish Modern chairs had some creaky joints and were a little rough on the surface. We gave them a complete overhaul (original finish was not salvageable) and instead of being headed for the landfill, they are now headed for my space @ The Antique Gallery of Lewisville!

Tuesday, November 8, 2011

Grammatically Different Plates- Fresh Ideas Tutorial

Imagination is everything. It is the preview of life's coming attractions.
Albert Einstein

'Live-Laugh-Love'
'I Hope You Dance'
'Believe'
OMG! I am LOL because it has all just gotten so ridiculous, IMHO....

Is that what life has become- someone else's catch phrase?  Does it really reflect your thoughts and wishes for the day?  I am thinking "we can do better than this".  


By now you know I love quotes and Bible verses.  I find great inspiration and comfort in many of them.  I think words hold great meaning.  You probably know someone that has a favorite verse as well.  So wouldn't it be great to give someone (or yourself!) the gift of a word phrase that actually has some deeper meaning?  I'm going to show you how with just an inkjet printer and a few inexpensive supplies.

For this project you will need:
  • A few ceramic plates (or tiles)
I pick them up all over.  You may have a few lying around, but each of these were purchased for anywhere from .49-$2.00 ea.
  • Denatured Alcohol* (find it @ the hardware store)

*flammable- please use in well ventilated area away from flame
  
(click on above link to see where to buy)

 Lazertran has a TON of applications, but for this project we are applying it to a ceramic surface.  I used black type, but you can print colored images if you choose. Don't worry- We'll have more fun with it another day.

  •  Spray Polyurethane* (gloss or satin/matte)
* note: MUST be a urethane- acrylics will not dissolve film! 


  • a few cotton balls
  • a pan of water about 1" deep large enough to hold transfer
  • inkjet printer
There are basic instructions that come with the Lazertran, but believe me- it is nothing compared to the voice of experience here.  A few things to consider:

Choose a plate with a specific rim/edge detail to ease the transition from the Lazertran to the edge.  You can see a faint line of the transfer on some types of plates more than others, especially with a curved inner edge.

 Try to make your image a large enough size to come close to the transition line.  It just looks neater.

I thought the gloss urethane gave a better result on my ceramic plates, but consider the original sheen of your item to give it a authentic look.

If you need to sand out any imperfections in your urethane finish- be sure it is fully cured and use a scotchbrite style sanding pad (fine grit) and lightly sand the surface without putting any real pressure on the pad.  Then apply a light final coat. You may also need a sharp pin/needle to prick air bubbles in the transfer.  

Measure your plate ahead of time to determine the size of your phrase.  I like to use Publisher because it has a handy ruler on the side of the page, but use whichever program you are familiar with.  You do not need to "mirror" or flip your image!  Also, I do at least one 'test' sheet on regular paper to be sure I have things the correct size before I print on the Lazertran sheet.  I would much rather waste a cheap piece of copy paper getting things right.

When you have things the way you want it- print on the white side of the Lazertran.  I'm cheap, so I try to get 2 or more projects per sheet.  Allow it to fully dry- 30 mins or so.  If you are impatient you can try a heat gun, but no promises- OK?


I like to find a circle 'template' to use to get the size/centering correct.  You may have a circle cutter.  I do.....somewhere!  If your plate is square, measure twice, cut once ;-)


Use a pencil to mark your cutting line- then cut just inside the line.


Gather your materials on a covered surface


It's good to check the back of the plate so if there is a logo you get it orientated correctly with what will be your finished product.


Sunday, October 23, 2011

Bad Blogger is Back With a New 'Old' Lamp Project!

What can I say?  It's been a busy past few months!!  My son returned to High School and so we had to get back into the 'school routine', my Rheumatologist had me try a new medication which did not agree with me at all.  As a matter of fact, lets just say short of my anaphylactic reaction to a few other medications I have had in the past, it ranked right up there on the 'bad experience' scale.

I also got a new great-niece!  After 40 hours of labor (yes- you read that right!)  beautiful (and not just because she is 'ours') baby Arwen was born!


Then I went on an 'antiquing' trip to MI, got some fabulous things, got sick from being stuck in that sardine can they call flying coach, and just barely had time to whip up a fall project!   I tend to decorate for fall, not Halloween.  I don't have any small children and the fall theme takes me through Thanksgiving.


Lately it seems, I have had a 'thing' for lamps.  I don't know why.  Possibly because they are plentiful and inexpensive.  One thing for sure- I will never pay full price for a lamp or shade again!

So here is my 'latest' new 'old' lamp project:


But- as usual- we gotta get there, right?  

I recently bought the barley-twist lamp in the photo at our neighborhood garage sale for $3.  I switched out the shade for a narrower one I had on hand from a different lamp I was not currently using so I could group the lamps together.  I think it makes for a kinda neat display  :)

The 'project' lamp is an old, sad 8" tall (minus the shade) glass lamp I got at the local thrift for $4.49.  You know the kind- popular in the 1980's.  Depending on your age, you may already have one around the house  ;-)
Be sure to look at the bottom to see that it is easily taken apart by undoing the wing-nut that holds the threaded rod that goes up the middle.  Just undo it, loosen the cord up through the lamp and you are ready for spray paint.


 I used black satin spray paint and put a little blue tape around the cord to keep the paint off.  Paint the base, and the brass-colored threaded rod that goes in the center.  Of course, you can use whatever color suits you and your project.  Clean the glass and get ready to fill it up!  You could use pine cones, acorns, candy corn.....I chose these cute mini pumpkins and threw in a few small pine cones from my stash.

Tuesday, June 21, 2011

Ribbon Storage Idea- A 1 Hour Craft

Do you ever spend way too much time looking for something to fulfill a storage or space requirement and then think "duh.....I can just MAKE that!" ?

I have had this idea for vertical ribbon storage for some time now.  I kept thinking about possibly modifying a paper towel holder but the bases are typically too large.  Then the other day I was clearing out some stuff from a shelf in the shed and realized I had everything I already needed!  Booyah!

This is what it looks like completed


This is the pile of junk supplies that started the process


I also used some wood glue, a little 220 grit sandpaper, black spray paint, and ended up using a wooden spool on the top.  My husband was nice enough to put together a cute little power tool kit just for me..........guess he got tired of the endless 'honey-do's' and looking for his tools  :)   So I got to use my awesome new cordless drill on this project!  
The 2 inch diameter wooden disc is a cedar block that had lost it's scent.  Any size piece of wood would work as long as it is larger than the wheel.  The hole in the wheel was not quite large enough to push the dowel into, so I used my handy drill to make the hole the correct size, added a little glue to the bottom edge of the dowel and stuck them together.


Then I just glued the disc to the top of the candlestick, and the wheel with dowel attached to the disc.  I let the whole thing dry about an hour.

Sunday, February 6, 2011

Super-de-Duper Valentines Garland


 Happy Super-Bowl-Sunday!!  Here in North Texas it is all we have heard about on the news for about a month now.  They have even had a countdown clock (I kid you not) at the bottom of the TV screen just to give us a second-by-second update.  *sigh*  I do like professional football a great deal, but having the Superbowl here at Jerry World is causing me burn out.  

This past week was certainly a trying one.  Like most of the country we had winter return in a really ugly way.  My son, who thank God is a sophomore and not a kindergartener, was home a record 4 out of 5 days last week.  So at least he can occupy himself and it kept cabin fever to a minimum around here.  We baked (and ate) chocolate chip cookies, watched movies, and I was free to work on projects all day long!  Since there is no snow removal equipment here, you just sort of have to tough it out until the ice and snow melt and things get back to near normal.  I keep the house stocked with food and toilet paper anyway, so I can hole up here for a month if need be.  

With Christmas long gone, the house seems a little bare now that the decorations are packed up and put away.  And let me tell you, after the gloom, sleet and snow we had last week, I was looking for a little pick me up in decor around here!  So, I pulled out some supplies and got to work......here is the result:


If you have a few fabric scraps and a little time on your hands, you can easily make one, too!  Here is the tutorial:


You will need basic sewing supplies and/ or hot glue
Print a copy of the Pennant Template
(note: I printed it at 125%)
I upcycled an 80's Valentines vest I thrifted, and pulled together a few remnants that complimented my decor


I started with red bias tape, but ended up using black double-fold bias tape instead.  I just liked the way it looked with my accents better.  I made 16 yo-yo's using my orange Clover yo-yo maker.  If you do not have one, it is approximately a 4 inch diameter circle made into a yo-yo.  I just mixed it up with various fabrics that I thought worked together.


I wanted to give the pennants some weight, so I cut 3 layers- the face fabric, a layer of felt and a layer of flannel.  I did that for all 5 pennants, so a total of 15 pieces. 


All you need to do is just layer them together, pin to hold them somewhat in place, and sew just over 1/4" all the way around the face.  Don't worry if they are *wonky*, you will fix that in a little bit.


Sunday, December 5, 2010

More *almost* Free Gifts

I like to think that God has a sense of humor.  

Case in point- I have often been referred to as 'The Queen'......don't ask me why  ;-)   Seriously- even as a little girl my parents said I must think I was the Queen.  Hmmmm.  So, it would only be *fitting* that I should get a crown for Christmas, right??  Unfortunately, the crown I am getting is NOT the kind to put on my head!!  That's the irony at play here.....last night I cracked a porcelain crown on a molar.  Yippee  :/

So guess what.  More people on my gift list will be getting something handmade this year.  Not necessarily a bad thing. 

I visited a few craft shows in the last few weeks, and there are lots of ways to spend your hard earned money to buy 'personalized' gifts for the folks you love.  I have admired the collage name prints that have the lettering made from architectural pics that resemble or are letters.  Given my architectural background, that is a given, right??  


You can imagine my excitement when I found a Flickr group with these images to share FOR FREE!!  Ahhh, sometimes the stars align.  The name collage prints I saw for sale (unframed) at the craft shows were running just about $10 per letter, and that was in black and white.  I'm sure with the cost of colored ink, they figured why bother increasing their costs, right? 


Certainly, if you want, you can make these personalized word/name prints in black and white.  I like to add color through artwork, so I chose to print my collage on my color laser printer.  Just to save you some time, effort and ink, I will tell ya I tried this with canvas paper and got a pretty mottled result.  I got a vivid print with white cardstock, lightly textured.

Here is my collage print:


Here is my finished project:


The editing and collage program I use is Picnik The basics are free, but the collage part I used is in the premium features which are under $30/yr.  You may already have an editing program you love.....I was just putting that out there for anyone that doesn't already have one.  


Leo Reynolds  is kind enough to share his fabulous collection of architectural photos with everyone FOR FREE (you can tell I love FREE, right??) as long as you follow his copyright rules, which means no resale, but give as many of these awesome gifts as you choose!  


 Just a footnote:
I had my mat custom cut @ my local hobby store for a cost of $5.  The frame was one of many I have purchased over the course of the year at garage sales, etc.  You may have one laying around that could just use a fresh coat of paint.  But, still this project was far below the $150+ it would have cost to have the people at the craft show do it- and the most time consuming part was looking through all of Leo's great photos and selecting my favorites.
A BIG *thanks* to Leo for all of the fantastic Flickr images!

Thursday, December 2, 2010

Still Time For a Homemade Gift.....

The weather outside is delightful these days.  But, being December it is not destined to last.  We have had a very mild and dry fall.  Most of our trees still have not turned colors.  It seems strange to have green leaves on many trees, and Christmas decorations everywhere.  I grew up in Michigan in the crook of the thumb and when I lived up there the first 20 years of my life winter meant SNOW!  Lots and lots and lots of snow.  Truck it down by the Tittabawassee and maybe by June it would be all gone. 

The extraordinary diversity of Texas includes 10 climatic regions, 14 soil regions, and 11 distinct ecological regions.  Here in North Central Texas we have 4 distinct seasons.  That means lots of clothes for everything from zero to 110 degrees!!  We are blessed with a long *flip flop* season, but we definitely also use warm coats, hats, gloves and boots.  Which brings me to this weeks tutorial.  It is a fast, fun upcycle which has a million possibilities for customization and personalization, and it is totally wearable, too!

Isn't this the cutest headband ever?? 
(Not so sure I'm giving this one away)


Here is my finished project:
Once you see how simple these are to make, and basically free, you will never spend $$ to buy one again!  I am totally working on the matching scarf!

Okay- this looks like a lot of steps, but hang in there.....once you get the pattern made it goes really fast.  
Gather some supplies:
I used an old pair of grey sweatpants that no longer fit anyone, and a scrap of red polar fleece left over from another project.  I am also considering using the wording area from a sweatshirt that no longer fits, and a felted sweater.  I hope to have some of those made to show you before Christmas, but no promises.  If you make one, I would love for you to email me the pics, so I can add it to the blog for others to see  :D
You will need basic sewing skills, basic sewing supplies, some paper to make the pattern (I used legal sized printer paper), and freezer paper for the stencil.    
I started by freehand sketching a basic headband shape on a piece of legal paper:
To make it come out even, fold in 1/2 width-wise, then fold in 1/2 length-wise, and refine the shape when you cut it out.  Use your sketch lines as a guide:
Here is the first part of the pattern cut out:
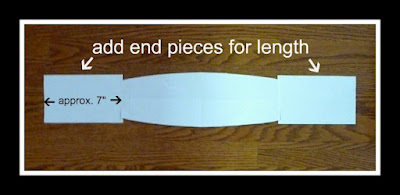
Add some ends to make it long enough:
Trim it to smooth out the shape:
Now you have your pattern!  Cut one of your top fabric (mine is the grey sweats) and one of the lining (mine is red fleece).  Be sure you cut your length with the stretch of the fabric!  I cut out a test pattern from some scraps of plaid fleece just to be sure I liked the size of the band on my head.  I have a pretty *average* sized head, so my pattern size should work for *most* everyone.  If you are the *Big Head* person in your family, (you know who you are) you may want a slightly wider band.  
 Here is the part that took me forever the most time.....picking the graphic!  Lucky you- you can copy my design if you want!
You are welcome to download a copy here:
When I printed it, I used the 'landscape' paper setting, letter size paper, and I 'justified' or stretched it to the length of the paper.
I traced the design loosely onto my freezer paper.  If you want, you can print on the freezer paper.  I wanted to be able to trace it more than once.
 Carefully cut out your design, and iron it onto your fabric, using the 'wool' setting on the iron:
I used VersaCraft ink for fabric in black.  I blotted it on, using my fingers under the fabric to get the edges of the design darker.  You could also use paint for fabric, or add a textile medium to acrylic paints.  Just be sure to heat set after it has dried.  

All My Best

Telling People What I Think For 40+ Years!!

Blog Advertising - Advertise on blogs with SponsoredReviews.com