Crafty Moose gone wild!

Welcome to the Ticklish Moose blog!

Be sure to visit my webstore for some great freebies, as well as Ticklish Moose merchandise:


http://www.ticklishmoose.com/

Creative License

Creative Commons License
All Shown On This Blog by Ticklish Moose is licensed under a Creative Commons Attribution-NonCommercial-ShareAlike 3.0 Unported License.
Permissions beyond the scope of this license may be available at http://www.ticklishmoose.com.

Search This Blog

Showing posts with label customized. Show all posts

Wednesday, August 1, 2012

Summer Sandals- As Seen on AllFreeHolidayCrafts.com


 I think quite a few of you have seen these 'home-made' summer sandals or some variation there-of, although most I have seen were flip-flop styled.  I am reposting a GENIUS idea from a blog called annekata. These are so wonderful for all of the ladies (and kids!) out there that just can't stand the thingy-between-the-toe!

I found them on a site called AllFreeHolidayCrafts.com


Enjoy!

Friday, July 13, 2012

Button, button....

who's got a button?  ME! 
As usual- it's been a busy few weeks.  I helped my daughter get moved into her new apartment, fixed up a few frames for new apartment, helped pick new furniture for new apartment, and on Sunday I will (probably) help hang frames and shelves in new apartment. (whew!!)  So who on Earth has time for any crafting?? Well.....ME!

Kinda.

I have been fascinated with buttons of all kinds for a long time, and as you can imagine, I have a fairly substantial button collection.  So it seemed a natural progression to make a few of my own!  This go-round I am using Premo` polymer clay, but I'm pretty sure I will try my hand at a few wooden buttons before it's all said and done.

 This group of buttons (and a heart-shaped pendant or two) is from one small package of Premo`.  I experimented with a few different kinds of cutters and embossing tools to get a feel what worked and what didn't.


Here is what I found so far:
  • actual 'cutters' work best
  • stamps or embossing plates with deep, small impressions give the best detail/results
  • use a toothpick or fine knitting needle to poke the holes
  • poke the holes from both sides


I used Stazon black ink to highlight (is that the correct word?) the detail on one button after it had baked and cooled, then painted it with latex paint from one of those little jars I told you about, and lightly rubbed the wet paint back off to show some of the black details through the blue paint. 
I plan to try a few more paint and topcoat combos on the rest of the buttons in a few days when I have a little more time to get out "the works" and play.
I'll be sure to show you the results!

Tuesday, November 8, 2011

Grammatically Different Plates- Fresh Ideas Tutorial

Imagination is everything. It is the preview of life's coming attractions.
Albert Einstein

'Live-Laugh-Love'
'I Hope You Dance'
'Believe'
OMG! I am LOL because it has all just gotten so ridiculous, IMHO....

Is that what life has become- someone else's catch phrase?  Does it really reflect your thoughts and wishes for the day?  I am thinking "we can do better than this".  


By now you know I love quotes and Bible verses.  I find great inspiration and comfort in many of them.  I think words hold great meaning.  You probably know someone that has a favorite verse as well.  So wouldn't it be great to give someone (or yourself!) the gift of a word phrase that actually has some deeper meaning?  I'm going to show you how with just an inkjet printer and a few inexpensive supplies.

For this project you will need:
  • A few ceramic plates (or tiles)
I pick them up all over.  You may have a few lying around, but each of these were purchased for anywhere from .49-$2.00 ea.
  • Denatured Alcohol* (find it @ the hardware store)

*flammable- please use in well ventilated area away from flame
  
(click on above link to see where to buy)

 Lazertran has a TON of applications, but for this project we are applying it to a ceramic surface.  I used black type, but you can print colored images if you choose. Don't worry- We'll have more fun with it another day.

  •  Spray Polyurethane* (gloss or satin/matte)
* note: MUST be a urethane- acrylics will not dissolve film! 


  • a few cotton balls
  • a pan of water about 1" deep large enough to hold transfer
  • inkjet printer
There are basic instructions that come with the Lazertran, but believe me- it is nothing compared to the voice of experience here.  A few things to consider:

Choose a plate with a specific rim/edge detail to ease the transition from the Lazertran to the edge.  You can see a faint line of the transfer on some types of plates more than others, especially with a curved inner edge.

 Try to make your image a large enough size to come close to the transition line.  It just looks neater.

I thought the gloss urethane gave a better result on my ceramic plates, but consider the original sheen of your item to give it a authentic look.

If you need to sand out any imperfections in your urethane finish- be sure it is fully cured and use a scotchbrite style sanding pad (fine grit) and lightly sand the surface without putting any real pressure on the pad.  Then apply a light final coat. You may also need a sharp pin/needle to prick air bubbles in the transfer.  

Measure your plate ahead of time to determine the size of your phrase.  I like to use Publisher because it has a handy ruler on the side of the page, but use whichever program you are familiar with.  You do not need to "mirror" or flip your image!  Also, I do at least one 'test' sheet on regular paper to be sure I have things the correct size before I print on the Lazertran sheet.  I would much rather waste a cheap piece of copy paper getting things right.

When you have things the way you want it- print on the white side of the Lazertran.  I'm cheap, so I try to get 2 or more projects per sheet.  Allow it to fully dry- 30 mins or so.  If you are impatient you can try a heat gun, but no promises- OK?


I like to find a circle 'template' to use to get the size/centering correct.  You may have a circle cutter.  I do.....somewhere!  If your plate is square, measure twice, cut once ;-)


Use a pencil to mark your cutting line- then cut just inside the line.


Gather your materials on a covered surface


It's good to check the back of the plate so if there is a logo you get it orientated correctly with what will be your finished product.


Sunday, October 30, 2011

Custom Stamps- The Way To Go!

Just a quick post to give you a heads up on a favorite product I have recently purchased- They are custom Trodat rubber stamps from Stampxpress.com!  I use them on all of my merchandise hang tags for the products in my booth, as well as return address info on packages and letters I send out.

With this being Breast Cancer Awareness month an easy way to help the cause would be to order your custom self inking Trodat stamp with the Breast Cancer Awareness ribbon so the profits go to help cure this horrible disease.

It seems that every woman knows at least one other woman affected by breast cancer.  I hope that none of you has personally suffered this kind of loss, but I have lost 3 people in my family to cancer and it is so hard.

With Christmas right around the corner, many of us will be sending out cards, and it makes it so much easier to be able to stamp the signatures or return address- and you can truly get so many designs now, why not?   Trodat stamps are made in the USA, and I am such a big supporter of all American made products and companies.  I think it is hard to complain about the state of the economy if you are not doing all you can to support small businesses right here. 

Thanks for taking time to make a difference today!  I always appreciate all that you all do!!

Sunday, August 28, 2011

Owlies- A Free Owl Pattern and Tutorial!

I am one of those people blessed with great family members.  Not to say we don't have our issues, fight now and then like families do or have a weirdo or two (which I am convinced is NOT me).  But all in all, through thick and thin we love each other to pieces.

So imagine my delight at finding out that one of my nieces was expecting a baby.....and a girl at that!  You know, I do love all things girly.  And who can resist a sweet little baby?  Unfortunately, my niece is full-term and has been in the path of Irene, but baby stayed put (whew!) and the power is back on in their area.  You know how the end of your pregnancy is.  And you can imagine she was thinking "Seriously?!? A freakin' HURRICANE?"

Well, enough of that.....back to me.

I wanted to make something special for baby, and much to my delight the 'theme' was owls, and the color of the nursery was to be green and brown.  I had seen a cool mobile some time back and had been wanting to try one- I just knew it was the project for me!  Originally I was going to attach the owlies by ribbons to a wooden embroidery hoop, but soon became obsessed with making it musical as well.  I scoured all of the local thrifts for gently used baby mobiles to no avail.  I was running out of time when I stopped into a Kid to Kid store to see what they had.  And wouldn't you know it- amongst  the pink Care Bears  and blue Cars mobiles I found this:


The perfect base for my newest creation!  
Couldn't wait to cut those sports figures off!!


I could not find an owl pattern anywhere that was exactly what I needed, so I made my own.  Feel free to download and use it, but please give a link back or shout out-K?  


Download Full Size Pattern Here


Suitable materials for this project are felt (wool or poly), suede or leather (I upcycled some old jackets), suit weight woolens (once again, I upcycled), quilt weight cotton for the tummy, and whatever buttons, embroidery threads, ribbons, etc. you would like to add.  I stuffed mine with a high quality poly fluff filling and sewed it on the machine, but you could easily also sew these by hand with a blanket or back stitch.


Cut out the pattern pieces from whatever fabrics you have chosen.  I used fusible web on the back of my cotton tummy piece to hold it in place while I stitched it on, and used a decorative stitch, but that is your discretion. 


Wednesday, July 13, 2011

Odds and Ends


In all my years of thrifty finds- this is one of my all time favorites!
It is 40" x 40" square and still has the World Market tag on the back!  I think it is going to look great in my daughter's new apartment.  


I am having a melancholy day.  My little doggie is at the hospital getting oral surgery and my nephew may or may not be in the people hospital after a nasty car accident on the freeway.  My oldest sister does not seem to have the ability to use any modern methods of communication including but not limited to the phone, texting, email or smoke signal.  So I am sending out a little prayer for you Tim and hope you are doing OK.

I am working on a super-secret project that I will do a tutorial on after the recipient has gotten it and it's not a secret any more  :)   This is a cabin-fever time of year for me because the heat and intense UV rays keep me from being outside too much.  You would think I would get a lot done, but I spend time obsessing on things......Like this chair:
I bought this chair and ottoman 13 years ago at a great price to fill a big corner of the library of our old house.  It is really large, not super-comfy but not bad either.  I just keep thinking it could be more "me".  But look at all of those furniture tacks!  I just don't think I have it in me to completely rip into this, plus the leather is in perfect shape, as the chair has not had any heavy use.  I have been toying with the idea of just re-doing the bottom cushion, the arm pads and the loose back pillow.  I would like to do a foam core with a down wrapped seat so that it had more of the feel my Uncle Charlie's antiques had.  So it would envelop the person sitting in it more.


I am also considering making my own fabric design for the back pillow, and toying with a few ideas:


So now you know my intentions.  We'll see what happens in the end.  ;-)

Sunday, June 12, 2011

Dyed to Match Buttons- Who Knew??


Evidently, dye is not just for fabric!!  I wanted to share a tutorial I ran across yesterday that really opened my eyes to some new possibilities.


 This tutorial comes to us from Rit dye, but of course you could probably experiment with some products you had around the house as well.
And- if it dyes plastic and nylon......well, just think of the things that could use a facelift!! 


Dyed Buttons


Whether you are a crafter or a sewing fashionista, you will enjoy dyeing buttons. It’s fun and easy to do. Most white buttons are made out of nylon or some type of plastic. Rit is one of the few dyes that will color these materials. That means you can transform ordinary buttons into colorful accents that match or coordinate with whatever you are making.
Assorted White Buttons before dyeing


Muffin pan doubles as a button organizer when working on craft projects

Rit Dye colors shown:
  • Top: Fuchsia, Lemon Yellow, Violet
  • Bottom: Sunshine Orange, Evening Blue, Scarlet


Buttons add a colorful accent to flower arrangements!


Rit Dye colors shown:
  • Lemon Yellow, Golden Yellow, Sunshine, Orange, Apple Green

 Ready to get started??


Saturday, May 14, 2011

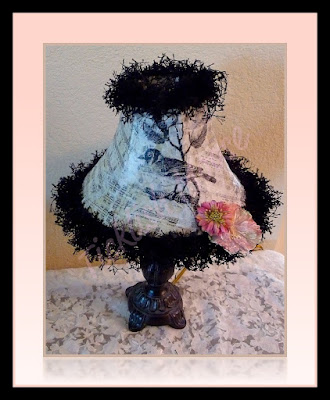
Thrifty Tissue Paper Lampshade (a tutorial)


I haven't asked you to make me young again. All I want is to go on getting older.
- Konrad Adenauer


That quote sums up a lot of my feelings on the process of repurposing and upcycling items and clothing.  I do not like the "throw away society" that we have become.  I guess some of that comes from my age- after all, "back in MY day" when your TV broke you could take the back off, remove the tubes, go down to the corner grocery to test and replace the faulty parts.  I love taking things that still have some life in them, and bringing them into this decade.


I have become obsessed with vintage images and image transfer.  And I especially love bringing those long-forgotten images forward and creating something natty contemporary.  


 Here is the latest and greatest "after"


But ya gotta get there, right?  So- let's do this thing!!


Start with one sad old lamp
My lamp is small with a vinyl-covered shade.  This process would work for most any flat surfaced (non-pleated) shade.  I simply downloaded this image from Graphics Fairy 


Karen has 1000's of free images to use- and I go to her site often  :)

I also used this image  (quote) I found on the internet to build on, so to speak:
I also went online and found sheet music for 'bird themed' songs.....you know, like Rockin' Robin, Black Bird, Mockingbird, etc.   Since my lampshade is just 7" high, I used Publisher to combine/print 2 images per 8 1/2" x 11" sheet of paper.  I wanted the light to shine through the images, so I printed them onto tissue paper.


Here is where the word *tutorial* pays off for you- because I get to spare you a bunch of frustration and cursing sobbing.  

  1. get some 1/2" wide 2-sided tape (you may use this already for scrapbooking)
  2. use plain cardstock paper, not textured (8 1/2 x 11)
  3. use cheap old tissue paper- not the kind with a *nice* glossy side
  4. if possible, print your images with a laser printer or use a copy machine.  The toner-based inks do not run when you get them wet with decoupage medium.
DO NOT BELIEVE the other blogs that tell you that you can somehow stick the tissue paper with spray adhesive to the cardstock and run it through and come up with something usable in the end.  THEY LIE!!!!!

Use this simple, Ticklish Moose Tutorial Tip, which makes it so simple you will laugh out loud....ready??  Bwaa-haaa-haaa!!  

 Tutorial Tip:
Simply adjust the size of your image so you have a decent 3/4" to 1" of margin space outside of the actual image you want to use.  Stick the 1/2" wide piece of 2-sided tape across the leading edge (end that feeds into the printer) of the cardstock.  You can use 2 smaller pieces on the  other end just to keep the tissue paper nicely in place as it feeds through the printer.  You can smooth out (or lightly crumple up) the tissue over top of the taped cardstock.  Flip it over and trim off any excess tissue paper.   Put the tissue paper covered cardstock into your printer so you print on the tissue paper side.  Print your image and voila`...... you did it!!  Carefully tear off your printed page.

Repeat as many times with the cardstock as you need images.
I used 6-7 printed sheets for my small shade (I had a few scraps leftover)


Gather up your printed pages, a foam brush and whatever decoupage medium you prefer.  I used PPA for this application.


Monday, January 31, 2011

New Year, New Ideas

I'm still here, for anyone that was wondering.  I customarily use January as my month to assess what worked or did not work in the previous year.  I like to re-organize things and get a fresh start.  

My specialty has always been organization, and my work with the rich and famous gave me endless ways to help people keep track of what they owned.  My designs were always what I liked to call 'living organization'- a true reflection of the person and how they lived.  I had women tell me that they would just sit in the awesome closets I designed and eat lunch, or watch TV.  Or spend hours in Butler's pantries and kitchens marveling at how it all just 'worked so perfectly'.  There were private prayer rooms, secret hidden offices, beauty salons, magnificent libraries.  So, people would always comment how my home must be so perfectly organized. Hmmm.....the cobbler's children have no shoes.

Honestly, it really is not all that bad.  However, I always see room for improvement, and when things really just blow up all around me, I realize it is time to take stock once again.

So, don't hate me for having an awesome husband and son who work hard to make my visions a reality, but let me show you my newest little "me" place in my home:


I was at a bead, button and fiber store in McKinney when I saw the antique wooden spools used to organize the trims, as well as lots of little jars.  I knew right away that it was what I wanted!  So, since last April I have been collecting different sizes of wooden spools as I see a good deal, and hoarding little jars of all shapes and sizes.


This isn't all of them, but you get the gist of it.   I painted wooden lids black, and used black & white scrapbook paper to cover metal lids.  The best thing is- I can see what I have!!  I still have a little way to go with the final design on this- I would like to add a fabric covered tackboard under the upper cabinet, and some art on the wall, but all in all, I am very proud of what I have accomplished so far! 

So, that is some of the work that has gone on behind the scenes.  I have bought some great books with projects that involve spray paint (one of my favorites), and easy methods to dye fabrics.  So, there will be a lot of new fun projects this year- I promise.  

I also wanted to share a couple of things I have for sale up at Artizan's Alley right now.  They are ideas you can easily copy, or change to reflect your own tastes.  The 'Texting Gloves' are certainly not a new idea, but since I only text with my thumbs, I kept the other fingers of the gloves intact.  Why should all of the fingertips get cold??  
I used a little fray check around the edge of the cut off thumb, but if you did this project with polar fleece gloves fraying would not be an issue.


This pair is simply a silk mum disassembled, and 2-3 layers of petals held in place with a button.  A little hot pink trim just adds pizzazz!


I am still working on a way to make the file sharing easy for the embroidery fonts.  I think I have it....just bear with me a little bit longer on that.  

I would love to hear how you have eeked out crafting room in your home.  With space at a premium in so many areas, I would love to see how y'all have overcome challenges.  If you email me a photo of your space, and permission to post it, I would love to be able to share these ideas with everyone!


Sunday, December 5, 2010

More *almost* Free Gifts

I like to think that God has a sense of humor.  

Case in point- I have often been referred to as 'The Queen'......don't ask me why  ;-)   Seriously- even as a little girl my parents said I must think I was the Queen.  Hmmmm.  So, it would only be *fitting* that I should get a crown for Christmas, right??  Unfortunately, the crown I am getting is NOT the kind to put on my head!!  That's the irony at play here.....last night I cracked a porcelain crown on a molar.  Yippee  :/

So guess what.  More people on my gift list will be getting something handmade this year.  Not necessarily a bad thing. 

I visited a few craft shows in the last few weeks, and there are lots of ways to spend your hard earned money to buy 'personalized' gifts for the folks you love.  I have admired the collage name prints that have the lettering made from architectural pics that resemble or are letters.  Given my architectural background, that is a given, right??  


You can imagine my excitement when I found a Flickr group with these images to share FOR FREE!!  Ahhh, sometimes the stars align.  The name collage prints I saw for sale (unframed) at the craft shows were running just about $10 per letter, and that was in black and white.  I'm sure with the cost of colored ink, they figured why bother increasing their costs, right? 


Certainly, if you want, you can make these personalized word/name prints in black and white.  I like to add color through artwork, so I chose to print my collage on my color laser printer.  Just to save you some time, effort and ink, I will tell ya I tried this with canvas paper and got a pretty mottled result.  I got a vivid print with white cardstock, lightly textured.

Here is my collage print:


Here is my finished project:


The editing and collage program I use is Picnik The basics are free, but the collage part I used is in the premium features which are under $30/yr.  You may already have an editing program you love.....I was just putting that out there for anyone that doesn't already have one.  


Leo Reynolds  is kind enough to share his fabulous collection of architectural photos with everyone FOR FREE (you can tell I love FREE, right??) as long as you follow his copyright rules, which means no resale, but give as many of these awesome gifts as you choose!  


 Just a footnote:
I had my mat custom cut @ my local hobby store for a cost of $5.  The frame was one of many I have purchased over the course of the year at garage sales, etc.  You may have one laying around that could just use a fresh coat of paint.  But, still this project was far below the $150+ it would have cost to have the people at the craft show do it- and the most time consuming part was looking through all of Leo's great photos and selecting my favorites.
A BIG *thanks* to Leo for all of the fantastic Flickr images!

Thursday, December 2, 2010

Still Time For a Homemade Gift.....

The weather outside is delightful these days.  But, being December it is not destined to last.  We have had a very mild and dry fall.  Most of our trees still have not turned colors.  It seems strange to have green leaves on many trees, and Christmas decorations everywhere.  I grew up in Michigan in the crook of the thumb and when I lived up there the first 20 years of my life winter meant SNOW!  Lots and lots and lots of snow.  Truck it down by the Tittabawassee and maybe by June it would be all gone. 

The extraordinary diversity of Texas includes 10 climatic regions, 14 soil regions, and 11 distinct ecological regions.  Here in North Central Texas we have 4 distinct seasons.  That means lots of clothes for everything from zero to 110 degrees!!  We are blessed with a long *flip flop* season, but we definitely also use warm coats, hats, gloves and boots.  Which brings me to this weeks tutorial.  It is a fast, fun upcycle which has a million possibilities for customization and personalization, and it is totally wearable, too!

Isn't this the cutest headband ever?? 
(Not so sure I'm giving this one away)


Here is my finished project:
Once you see how simple these are to make, and basically free, you will never spend $$ to buy one again!  I am totally working on the matching scarf!

Okay- this looks like a lot of steps, but hang in there.....once you get the pattern made it goes really fast.  
Gather some supplies:
I used an old pair of grey sweatpants that no longer fit anyone, and a scrap of red polar fleece left over from another project.  I am also considering using the wording area from a sweatshirt that no longer fits, and a felted sweater.  I hope to have some of those made to show you before Christmas, but no promises.  If you make one, I would love for you to email me the pics, so I can add it to the blog for others to see  :D
You will need basic sewing skills, basic sewing supplies, some paper to make the pattern (I used legal sized printer paper), and freezer paper for the stencil.    
I started by freehand sketching a basic headband shape on a piece of legal paper:
To make it come out even, fold in 1/2 width-wise, then fold in 1/2 length-wise, and refine the shape when you cut it out.  Use your sketch lines as a guide:
Here is the first part of the pattern cut out:
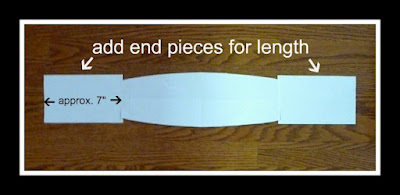
Add some ends to make it long enough:
Trim it to smooth out the shape:
Now you have your pattern!  Cut one of your top fabric (mine is the grey sweats) and one of the lining (mine is red fleece).  Be sure you cut your length with the stretch of the fabric!  I cut out a test pattern from some scraps of plaid fleece just to be sure I liked the size of the band on my head.  I have a pretty *average* sized head, so my pattern size should work for *most* everyone.  If you are the *Big Head* person in your family, (you know who you are) you may want a slightly wider band.  
 Here is the part that took me forever the most time.....picking the graphic!  Lucky you- you can copy my design if you want!
You are welcome to download a copy here:
When I printed it, I used the 'landscape' paper setting, letter size paper, and I 'justified' or stretched it to the length of the paper.
I traced the design loosely onto my freezer paper.  If you want, you can print on the freezer paper.  I wanted to be able to trace it more than once.
 Carefully cut out your design, and iron it onto your fabric, using the 'wool' setting on the iron:
I used VersaCraft ink for fabric in black.  I blotted it on, using my fingers under the fabric to get the edges of the design darker.  You could also use paint for fabric, or add a textile medium to acrylic paints.  Just be sure to heat set after it has dried.  

All My Best

Telling People What I Think For 40+ Years!!

Blog Advertising - Advertise on blogs with SponsoredReviews.com